This is a blog menat to help SAP ABAP professionals & Beginners to help revise concepts and learn concepts in a single place to help prepare for interviews.
It's under progress and not completed, but check it out if it's useful.
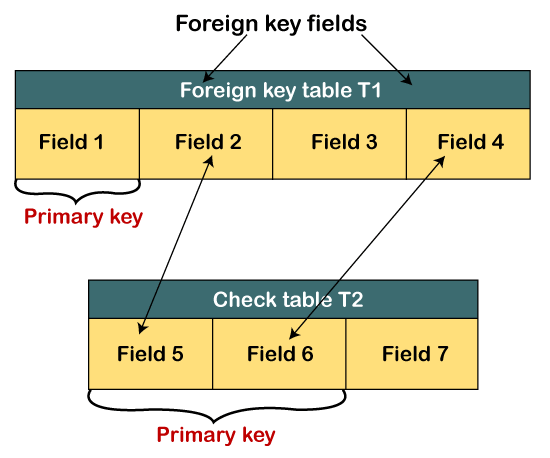
What is Foreign Key?
- Foreign keys are used to establish the relationship between the different tables present in the ABAP Dictionary.
- We can create value checks for input fields using the foreign keys. Value checks are required to validate the values of some fields in a table with the values of other fields of different tables.
- The table that contains the foreign key is called a foreign key table and another table that contains valid fields, known as the value table.
- It connects two tables by assigning the foreign key field of one table to the primary key field of another table.
- The below diagram shows the assignments of fields using a foreign key.
Below are the two requirements for creating a foreign key relationship:
- The fields used in the check table for the validation must be the primary keys.
- The foreign key fields in the value table and primary key fields in the check table must be of the same domain so that it can ensure that both fields are compatible with data type and length.
What is a Primary Key?
A primary key is a field that uniquely identifies the rows in a table by one or more columns. The primary key field cannot have a NULL value or duplicate values. In order to establish the relationship between two tables or to link the tables, the primary key of the first table (referenced table) will be added to another table (dependent table), and it will become the foreign key for the second table.
Concept of Foreign key Relationship:
The foreign key relationship is about relating or connecting two different tables in order to avoid redundancy and perform table validations in ABAP.
Table validation is a technique by which we can restrict the invalid entries in our table. There are two ways to perform the table validation in ABAP:
- Field Level Validation: In this method, we perform the field level validation by using the check table concept.
- Domain-Level Validations: Domain level validation can be performed by restricting entries at the domain level with the help of the value table of that domain and fixed values of the domain.
Creating Foreign keys in ABAP
Below are the steps to create the foreign key relationships in ABAP database tables:
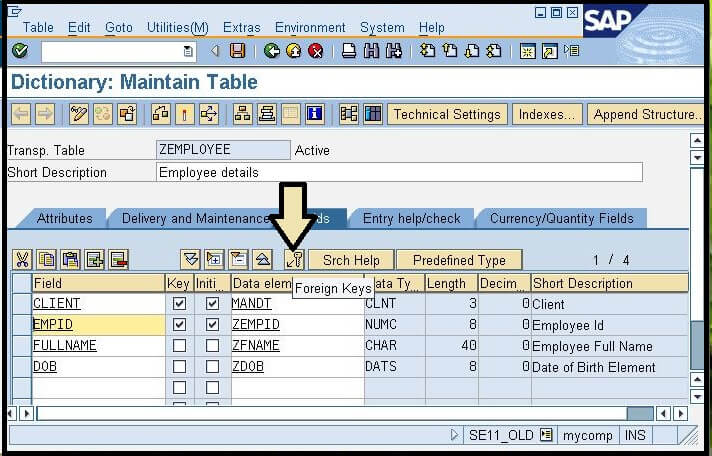
- Open the Data Dictionary initial screen by entering the SE11 transaction code or by following the menu path.
- Now create the first database table as Check table.
- Next, we need to create another database table, let's say it "ZEMPLOYEES" that contains three main fields, which are, EMPID, FULLNAME, and DOB.
- Once both the tables are created successfully, we can now create the foreign key relationships between the tables, follow the given steps:
- First, open the second table, i.e., "ZEMPLOYEE."
- Select the EMPID field from the table.
- Now click on the foreign keys button given on the screen. Consider the below screen:
- New windows will pop-up, where provide the Check table name, which is containing the master data. Consider the below image:
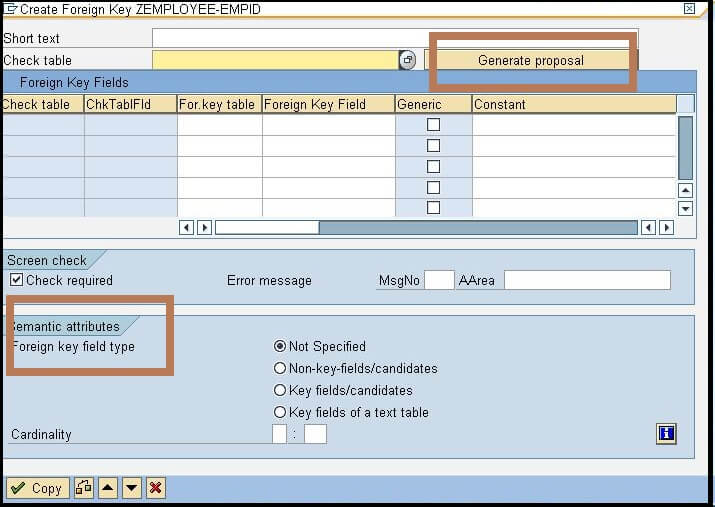
- Now at the below screen, you can see the option of Foreign key field type, which is containing four options. We have already explained these options in the above section.
- Now click on the Generate proposal button, and then click to the copy button.
- At last, click to save and activate it.
- Click on Unit testing to check whether it is working properly or not, so below are the steps for this:
- Go to the Utilities option in the table-> table contents-> Create.
- Enter some different name or a wrong name that is not present in the customer table, and click on the Save button.
- Once we save it, an error message will be displayed to us.
Delivery Class :
It tells SAP how the table’s data is delivered, transported, and treated across systems (DEV → QA → PROD).
There are the following development classes:
● A- Application table (master and transaction data).
● C- Customer table/Customizing table, data is only maintained by the customer.
● L- Table for storing temporary data.
● G- Customer table, SAP can insert new data records but cannot overwrite or delete existing ones. The customer namespace must be defined in table TRESC. To define the customer namespace use report RDDKOR54. You can start it directly from the table maintenance by choosing Maintain Customer Namespace on the Delivery and Maintenance tab.
● E- System table with its own namespace for customer entries. The customer namespace must be defined in table TRESC. To define the customer namespace use report RDDKOR54. You can start it directly from the table maintenance by choosing Maintain Customer Namespace on the Delivery and Maintenance tab.
● S- System table, data changes have the status of program changes.
● W- System table (for example table of the development environment) whose data is transported with its own transport objects (such as R3TR PROG, R3TR TABL and so on).
Behavior During Transport Between Customer Systems
Data records of tables having delivery class L are not imported into the target system. Data records of tables having delivery classes A, C, E, G, S and W are imported into the target system (for client-dependent tables this is done for the target clients specified in the transport).
Behavior During Client Copy
Only the data of client-dependent tables is copied.
● Class C, G, E, S- The data records of the table are copied to the target client.
● Class W, L- The data records of the table are not copied to the target client.
● Class A- Data records are only copied to the target client if explicitly requested (parameter option). It is not sensible to transport such data, but this is supported nevertheless to allow the entire client environment to be copied.
Behavior During Installation, Upgrade and Language Import
The behavior of client-dependent tables differs from that of cross-client tables.
Client-Dependent Tables
● Class A and C- Data is only imported into client 000. The system overwrites the existing data records.
● Class E, S and W- Data is imported into all clients. The system overwrites the existing data records.
● Class G- The system overwrites the existing data records in client 000. In all other clients, the system inserts new data records, but existing data records are not overwritten.
● Class L- No data is imported.
Cross-Client Tables
● Classes A, L and C- No data is imported.
● Classes E, S, and W- Data is imported. The system overwrites the existing data records with the same key.
● Class G- The system inserts non-existent data records, but does not overwrite existing data records.
Use of the Delivery Class in the Extended Table Maintenance
The delivery class is also used in the Extended Table Maintenance (transaction code SM30). The maintenance interface generated for a table performs the following checks:
● It is not possible to transport the entered data using the transport connection of the generated maintenance interface for tables having delivery classes W and L.
● Data that is entered is checked to see if it violates the namespace defined in table TRESC. If the data violates the namespace, the system rejects the input.
Data Class
Data Class tells SAP what kind of data the table stores, mainly for database performance and storage optimization.
determines the type of data usedin the table, If you choose the data class correctly, your table is automatically assigned to the correct area (tablespace or DBspace) of the database when it is created. Each data class corresponds to a physical area in which all the tables assigned to this data class are stored. There are the following data classes:
- APPL0 (master data): Data which is seldomly changed. An example of master data is the data contained in an address file, such as the name, address and telephone number.
- APPL1 (transaction data): Data that is frequently changed. An example of transaction data is the goods in a warehouse, which change after each purchase order.
- APPL2 (organizational data): Customizing data that is defined when the system is installed and seldomly changed. An example is the table with country codes.
Two further data classes, USR and USR1, are provided for the customer. These are for user developments. The tables assigned to these data classes are stored in a tablespace for user developments.
Control tables are customizing tables that control the behavior of an application, not the business data itself.
They answer questions like:
-
Is this function allowed?
-
Which status transitions are valid?
-
Which fields are mandatory?
-
Which process variant should run?
👉 They do not store transactions
👉 They do not store master data
👉 They store rules, switches, and parameters
@ObjectModel.usageType.sizeCategory -
It describes the expected data volume of the CDS view, not the database table.
@ObjectModel.usageType: {
serviceQuality: #X,
sizeCategory : #XL,
dataClass : #TRANSACTIONAL
}
Size Category of Database Tables
The size category determines the size of the initial memory reserved for the table on the database. Values between 0 and 9 can be specified. A number of expected rows from the table are assigned to these values.
| Size Category | Expected Rows |
| 0 | 0 to 1,000 |
| 1 | 1,000 to 4,200 |
| 2 | 4,200 to 17,000 |
| 3 | 17,000 to 68,000 |
| 4 | 68,000 to 270,000 |
| 5 | 270,000 to 540,000 |
| 6 | 540,000 to 1,000,000 |
| 7 | 1,000,000 to 2,100,000 |
| 8 | 2,100,000 to 4,300,000 |
| 9 | 4,300,000 to 170,000,000 |
If the initial space reserved is exceeded, a new memory area is added implicitly in accordance with the chosen size category.
When you create a table, the system reserves initial space (an initial extent) in the database. If more space is required at a later time due to data entries, additional memory is added depending on the selected size category. This is explained in the following figure.

Selecting the correct size category prevents the creation of a large number of small extents for a table. It also prevents the waste of space if extents that are too large are created.
Note
A size category must be chosen that does not create too many small memory area and no memory areas that are too big.
Search Help:Search Help, another repository object of ABAP Dictionary, is used to display all the possible values for a field in the form of a list. This list is also known as a hit list. You can select the values that are to be entered in the fields from this hit list instead of manually entering the value, which is tedious and error prone.
Creating Search Help
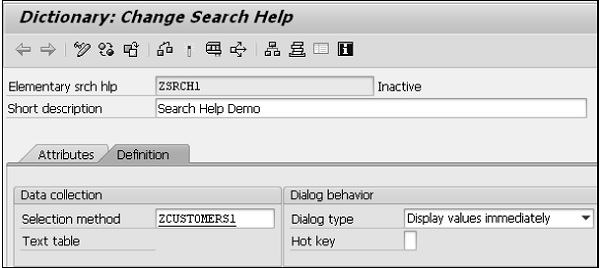
Step 1 − Go to transaction SE11. Select the radio button for Search help. Enter the name of the search help to be created. Let's enter the name ZSRCH1. Click on the Create button.
Step 2 − The system will prompt for the search help type to be created. Select the Elementary search help, which is default. The screen to create elementary search help as shown in the following screenshot appears.
Step 3 − In the selection method, we need to indicate whether our source of data is a table or a view. In our case it happens to be a table. The table is ZCUSTOMERS1. It is selected from a selection list.
Step 4 − After the selection method is entered, the next field is the Dialog type. This controls the appearance of the restrictive dialog box. There is a drop-down list with three options. Let's select the option 'Display values immediately'.
Step 5 − Next is the parameter area. For each Search help parameter or field, these column fields have to be entered as per the requirements.
Search help parameter − This is a field from the source of data. The fields from the table are listed in the selection list. The fields participating in the search help would be entered, one field in each row. Let's include the two fields CUSTOMER and NAME. How these two fields participate is indicated in the rest of the columns.
Import − This field is a checkbox for indicating whether a Search help parameter is an import parameter. The export or import is with reference to the search help.
Export − This field is a checkbox for indicating whether a Search help parameter is an export parameter. The export will be transfer of field values from the selection list to screen fields.
LPos − Its value controls the physical position of Search help parameter or field in the selection list. If you enter a value 1, the field will appear in the first position in the selection list and so on.
SPos − It controls the physical position of Search Help parameter or field in the restrictive dialog box. If you enter a value of 1, the field will appear in the first position in the restrictive dialog box and so on.
Data element − Every Search Help parameter or field by default is assigned a data element that was assigned to it in the source of data (Table or View). This data element name appears in display mode.
Step 6 − Perform a consistency check and activate the search help. Press F8 to execute. The 'Test Search Help ZSRCH1' screen appears as shown in the following screenshot.
Step 7 − Let's enter the number 100004 in the CUSTOMER's 'Ready for inp' screen field. Press Enter.
The customer number, 100004, and the name ‘STEPHEN’ is displayed.
Search Help
A search help is an object of the ABAP Dictionary which helps to purpose some list of values for some input filed.

2. Types of search helps
There are three types of search helps
- (a) Elementary search helps
Elementary search helps implement a search path for determining the possible entries.
- (b) Collective search help
Collective search helps contain several elementary search helps. A collective search help therefore provides several alternative search paths for possible entries.
- (c) Append search helps
Append search helps can be used to enhance collective search helps delivered by SAP with customer-specific search paths without requiring a modification.


Give a new name of the search help which you want to create for the standard search help and create a new elementary search help in the reference to the standard search is called as append search help.
3. Scope of the document:
Scope of this document is to explain the use of search help exits in the search help, we can apply the search help exit on both collective and elementary search helps.
But in this knowledge view we will take an example of an elementary search help.
4. Search Help Exit:
Search Help Exit: A search help exit is a function module which is used to make search help more flexible and we can code a single search help exit in such a way so that is can be used in various search helps.
We will explain the use of search help exit by taking an example of collective search help:
(a) Creating a new elementary search help:
Run T-Code: SE11
Press Create Button.
Specify search help selection method, for example EKKO (PO Header table)
Specify the search help parameters.
Do not specify the name of the search help exit for the time being.
Now active and execute the search help, you will see all the records form the table EKKO, but now if you want to control/ Manipulate the value of the search help output list. Then you need to use search help exit.

(b) Run T-Code: SE37
Create a Function module say YSUN_F4_SHLP_EXIT as a copy of the F4IF_SHLP_EXIT_EXAMPLE


Now create the same structure in the function module as of the search help.

Now we need to code the things under the standard IF condition given by the function module i.e. IF callcontrol-step = ‘SELECT’.
Let suppose we want to see the data of only year 2003 then we can also code it as shown by using our own select statement.
There is a function module F4UT_PARAMETER_RESULTS_PUT.This is used to pass the internal table data to the output list.


5. Apply Search Help Exit in the Elementary Search help:
Now put the name of the function module in the search help exit.

Now execute the search help, you will only have the purchase order of year 2003 as shown below:
Search Help
A search help is an object of the ABAP Dictionary which helps to purpose some list of values for some input filed.

2. Types of search helps
There are three types of search helps
- (a) Elementary search helps
Elementary search helps implement a search path for determining the possible entries.
- (b) Collective search help
Collective search helps contain several elementary search helps. A collective search help therefore provides several alternative search paths for possible entries.
- (c) Append search helps
Append search helps can be used to enhance collective search helps delivered by SAP with customer-specific search paths without requiring a modification.


Give a new name of the search help which you want to create for the standard search help and create a new elementary search help in the reference to the standard search is called as append search help.
3. Scope of the document:
Scope of this document is to explain the use of search help exits in the search help, we can apply the search help exit on both collective and elementary search helps.
But in this knowledge view we will take an example of an elementary search help.
4. Search Help Exit:
Search Help Exit: A search help exit is a function module which is used to make search help more flexible and we can code a single search help exit in such a way so that is can be used in various search helps.
We will explain the use of search help exit by taking an example of collective search help:
(a) Creating a new elementary search help:
Run T-Code: SE11
Press Create Button.
Specify search help selection method, for example EKKO (PO Header table)
Specify the search help parameters.
Do not specify the name of the search help exit for the time being.
Now active and execute the search help, you will see all the records form the table EKKO, but now if you want to control/ Manipulate the value of the search help output list. Then you need to use search help exit.

(b) Run T-Code: SE37
Create a Function module say YSUN_F4_SHLP_EXIT as a copy of the F4IF_SHLP_EXIT_EXAMPLE


Now create the same structure in the function module as of the search help.

Now we need to code the things under the standard IF condition given by the function module i.e. IF callcontrol-step = 'SELECT'.
Let suppose we want to see the data of only year 2003 then we can also code it as shown by using our own select statement.
There is a function module F4UT_PARAMETER_RESULTS_PUT.This is used to pass the internal table data to the output list.


Source Code for the search help exit as given below:
FUNCTION ysun_f4_shlp_exit. *"---------------------------------------------------------------------- *"*"Local Interface: *" TABLES *" SHLP_TAB TYPE SHLP_DESCR_TAB_T *" RECORD_TAB STRUCTURE SEAHLPRES *" CHANGING *" VALUE(SHLP) TYPE SHLP_DESCR_T *" VALUE(CALLCONTROL) LIKE DDSHF4CTRL STRUCTURE DDSHF4CTRL *"----------------------------------------------------------------------
TYPES: BEGIN OF i_ekko, ebeln TYPE ekko-ebeln, bedat TYPE ekko-bedat, END OF i_ekko.
DATA : t_ekko TYPE i_ekko OCCURS 0.
* EXIT immediately, if you do not want to handle this step IF callcontrol-step <> 'SELONE' AND callcontrol-step <> 'SELECT' AND " AND SO ON callcontrol-step <> 'DISP'. EXIT. ENDIF.
*"---------------------------------------------------------------------- * STEP SELONE (Select one of the elementary searchhelps) *"---------------------------------------------------------------------- * This step is only called for collective searchhelps. It may be used * to reduce the amount of elementary searchhelps given in SHLP_TAB. * The compound searchhelp is given in SHLP. * If you do not change CALLCONTROL-STEP, the next step is the * dialog, to select one of the elementary searchhelps. * If you want to skip this dialog, you have to return the selected * elementary searchhelp in SHLP and to change CALLCONTROL-STEP to * either to 'PRESEL' or to 'SELECT'. IF callcontrol-step = 'SELONE'. * PERFORM SELONE ......... EXIT. ENDIF.
*"---------------------------------------------------------------------- * STEP PRESEL (Enter selection conditions) *"---------------------------------------------------------------------- * This step allows you, to influence the selection conditions either * before they are displayed or in order to skip the dialog completely. * If you want to skip the dialog, you should change CALLCONTROL-STEP * to 'SELECT'. * Normally only SHLP-SELOPT should be changed in this step. IF callcontrol-step = 'PRESEL'. * PERFORM PRESEL .......... EXIT. ENDIF.
*"---------------------------------------------------------------------- * STEP SELECT (Select values) *"---------------------------------------------------------------------- * This step may be used to overtake the data selection completely. * To skip the standard selection, you should return 'DISP' as following * step in CALLCONTROL-STEP. * Normally RECORD_TAB should be filled after this step. * Standard function module F4UT_RESULTS_MAP may be very helpful in this * step.
IF callcontrol-step = 'SELECT'.
DATA : t_fields LIKE TABLE OF shlp_tab-fielddescr. DATA : w_fields LIKE LINE OF shlp_tab-fielddescr.
SELECT * FROM ekko INTO CORRESPONDING FIELDS OF TABLE t_ekko WHERE bedat LIKE '2003____'.
LOOP AT shlp_tab. LOOP AT shlp_tab-fielddescr INTO w_fields.
DATA : l_fname TYPE dfies-lfieldname. l_fname = w_fields-fieldname. CALL FUNCTION 'F4UT_PARAMETER_RESULTS_PUT' EXPORTING parameter = w_fields-fieldname * OFF_SOURCE = 0 * LEN_SOURCE = 0 * VALUE = fieldname = l_fname TABLES shlp_tab = shlp_tab record_tab = record_tab source_tab = t_ekko CHANGING shlp = shlp callcontrol = callcontrol EXCEPTIONS parameter_unknown = 1 OTHERS = 2 . ENDLOOP. ENDLOOP.
* PERFORM STEP_SELECT TABLES RECORD_TAB SHLP_TAB * CHANGING SHLP CALLCONTROL RC. * IF RC = 0. IF sy-subrc EQ 0. callcontrol-step = 'DISP'. ELSE. callcontrol-step = 'EXIT'. ENDIF. EXIT. "Don't process STEP DISP additionally in this call. ENDIF.
*"---------------------------------------------------------------------- * STEP DISP (Display values) *"---------------------------------------------------------------------- * This step is called, before the selected data is displayed. * You can e.g. modify or reduce the data in RECORD_TAB * according to the users authority. * If you want to get the standard display dialog afterwards, you * should not change CALLCONTROL-STEP. * If you want to overtake the dialog on you own, you must return * the following values in CALLCONTROL-STEP: * - "RETURN" if one line was selected. The selected line must be * the only record left in RECORD_TAB. The corresponding fields of * this line are entered into the screen. * - "EXIT" if the values request should be aborted * - "PRESEL" if you want to return to the selection dialog * Standard function modules F4UT_PARAMETER_VALUE_GET and * F4UT_PARAMETER_RESULTS_PUT may be very helpful in this step. IF callcontrol-step = 'DISP'. * PERFORM AUTHORITY_CHECK TABLES RECORD_TAB SHLP_TAB * CHANGING SHLP CALLCONTROL. EXIT. ENDIF.
ENDFUNCTION. |
5. Apply Search Help Exit in the Elementary Search help:
Now put the name of the function module in the search help exit.

Now execute the search help, you will only have the purchase order of year 2003.
SAP ABAP Control Break Statements
Control break processing in a internal table loop is used to execute statements written within the block AT and END AT, when the control structure changes. The AT statements (Begining of the blocks) determine the control break at which the statements written within the blocks are executed. Within these statement blocks, the SUM statement can be use to total the numeric components of a control level.
The prerequisite for using control break statements is that the internal table must be sorted in the exact order of the components of its row type according to the processing sequence in which the LOOP loop reads the rows of the internal table.
The control break "ON CHANGE OF - ENDON", can be used in any loop, not just LOOP... ENDLOOP. It can also be used in WHILE ... ENDWHILE.
There are Five control break statements -
1. At First / End At
2. At Last / end At
3. At New / End At
4. At End Of / End At
5. On Change Of / EndOn
Control Break Statements in SAP ABAP are used within AT and ENDAT, Control Break statements is used to control Loop in ABAP Programming. Control Break Statements event execute within loop, control break statement can also be treated as control break event. There is a ground rule to use control break statement they will be working within Loop.
Control Break Statement is different from Control statement, the BREAK, EXIT, CONTINUE are used to break and come out of the current loop where it occurs, where as AT NEW, AT END,AT LAST, AT FIRST is used to check for a table field value (internal table). When u asked for control statements alone, you need to answer as BREAK, EXIT, CONTINUE, CHECK because it controls the program flow.
Table of Contents
Types of Control Break Statements :
There are 4 different control break statements in SAP ABAP which we will discuss below one by one.
AT FIRST: – At First event or control break statement trigger only for first record of internal table in loop, For Example we want to perform the action only when first record trigger and the rest of the record we don’t want to perform that action so we will use At First event or control break statements in SAP ABAP.
Syntax :
Loop at it_final into wa_final.
AT FIRST.
Statement1.
Statement2.
Statement3.
ENDAT.
Endloop.
AT LAST:- At Last event or control break statement trigger only for last record of internal table in Loop, For example we want to perform the action only when last record trigger and the rest of the record we don’t want to perform that action so we will use At last event or control break statements in SAP ABAP.
Syntax :
Loop at it_final into wa_final.
AT LAST.
Statement1.
Statement2.
Statement3.
ENDAT.
Endloop.
AT NEW:- At new event or control break statement trigger only when new record or field trigger which we mention with event in loop, For example we want to display record only when new repeated matnr trigger in loop so we will use At new event or control break statements in SAP ABAP.
Syntax :
Loop at it_final into wa_final.
AT NEW field.
Statement1.
Statement2.
Statement3.
ENDAT.
Endloop.
AT END OF:- At end of event or control break statement trigger only when end record or field trigger which we mention with event in loop, For example we want to display record only when last repeated matnr trigger in loop so we will use At end of event or control break statements in SAP ABAP.
Syntax :
Loop at it_final into wa_final.
AT END OF field.
Statement1.
Statement2.
Statement3.
ENDAT.
Endloop.
ON CHANGE OF:- There is other control break statement available in SAP which is absolute, this control break statement is also used within loop like others statement.
Syntax :
Loop at it_final into wa_final.
On Change Of field.
Statement1.
Statement2.
Statement3.
ENDON.
Endloop.
Examples : Control Break Statements in SAP ABAP
Here is the example of control statement program with output screen, please check.
REPORT ZPS_CONTROL_STATEMENT.
SELECT MATNR, ERSDA FROM MARA UP TO 10 ROWS INTO TABLE @DATA(IT_MARA).
****** Without Control Statement*******************
WRITE:/ ‘Material Number’, 20 ‘Created On’.
ULINE.
LOOP AT IT_MARA INTO DATA(WA_MARA).
WRITE:/ WA_MARA-MATNR, WA_MARA-ERSDA.
CLEAR WA_MARA.
ENDLOOP.
******** With AT First Control Statement*************
WRITE:/ ‘Material Number’, 20 ‘Created On’.
ULINE.
LOOP AT IT_MARA INTO WA_MARA.
WRITE:/ WA_MARA-MATNR, WA_MARA-ERSDA.
AT FIRST.
WRITE :/’AT First record’.
ENDAT.
CLEAR WA_MARA.
ENDLOOP.
*********** With AT Last Control Statement***********
WRITE:/ ‘Material Number’, 20 ‘Created By’.
ULINE.
LOOP AT IT_MARA INTO WA_MARA.
WRITE:/ WA_MARA-MATNR, WA_MARA-ERSDA.
AT LAST.
WRITE :/’AT Last record’.
ENDAT.
CLEAR WA_MARA.
ENDLOOP.
*********** With At New Control Satement**********
WRITE:/ ‘Material Number’, 20 ‘Created on’.
ULINE.
LOOP AT IT_MARA INTO WA_MARA.
CONCATENATE WA_MARA-ERSDA+6(2) WA_MARA-ERSDA+4(2) WA_MARA-ERSDA+0(4) INTO DATA(LV_DATE) SEPARATED BY ‘.’.
AT NEW MATNR.
WRITE :/’AT new record’.
WRITE:/ WA_MARA-MATNR, LV_DATE.
ENDAT.
CLEAR: WA_MARA, LV_DATE.
ENDLOOP.
********* With At End of Control Statement***************
WRITE:/ ‘Material Number’, 20 ‘Created on’.
ULINE.
LOOP AT IT_MARA INTO WA_MARA.
CONCATENATE WA_MARA-ERSDA+6(2) WA_MARA-ERSDA+4(2) WA_MARA-ERSDA+0(4) INTO LV_DATE SEPARATED BY ‘.’.
AT END OF MATNR.
WRITE :/’AT End of record’.
WRITE:/ WA_MARA-MATNR, LV_DATE.
ENDAT.
CLEAR: WA_MARA, LV_DATE.
ENDLOOP.


AT FIRST IN SAP ABAP


AT LAST IN SAP ABAP


AT NEW IN SAP ABAP


AT End of in SAP ABAP


Problem with Control Break Statements
Sometime At first statement is not trigger due to some technical issue like we trying to call at first MATNR from IT_MSEG internal table where MBLNR listed first and MATNR is listing in third column so here At first MATNR will not trigger, to solve this issue we must adjust our internal table and get MATNR on first column.
NOTE: Use the 'At First' and 'At Last' statement to perform during the first or last pass of internal table. These statements can only be used within 'LOOP AT'; they cannot be used within select.
What is the difference between collect and sum?
Following are the differences -
- COLLECT statement is used to sum the value on a default key fields in the work area. The default key is composed of the values from all fields of type c, n, d, t, and x. Where the SUM statement is used to sum the value to the right of control level. The key is formed with the control level defined on the control break processing statement.
- SUM statement is used with the control break AT...ENDAT processing statement though COLLECT statement do not so.
- In the COLLECT statement, the system searches the body of the internal table for a row that has the same key as the key in the work area. If it doesn't find one, the row is appended to the end of the table. If it does find one, the numeric fields (types I, p, and f) in the work area are added to the corresponding fields in the found row.
While SUM, calculates a total for the current value of the control level that contains it. It finds all rows that have the same values within the control level field and all fields to the left of it. It sums each numeric column to the right of the control level. It places the totals in the corresponding fields of the work area.
If you want automatic grouping + sum, use COLLECT, else If you want manual control in control events, use SUM (or just accumulate via total_amount = total_amount + …)
Creating Lock Object and Using Lock in Program

Step 2. Provide the Short text and click on the Tables Tab.

Step 3. Provide the table name and Select the Lock mode as Write Lock and Click on the Lock Parameter Tab.

Step 4. All the primary key fields of the given table are added under the Lock parameter section.
Activate the Lock Object.

Step 5. When the lock object is activated it creates two function modules 'Enqueue & Dequeue'.
Navigate along the below shown path to get the generated function modules.

Step 6. FM names.

Step 7. Let's use the generated function module in a program .
Go to TCODE- SE38, provide a report program name and click on create button.

Step 8. Call the Enqueue Function Module to lock the Single record.

- Lock Objects in ABAP are part of the Data Dictionary which are primarily used for synchronisation tasks.
- When more than one program tries to access the same data, it requires a lock over the data so that there is no inconsistency in the final saved data.
- Whenever someone tries to modify or update data, ABAP needs to make sure that data remains integrated across all users or programs.
- Hence, we need to define lock objects for tables – their data along with key fields.
- Lock objects are global, reusable and important for synchronisation to generate function modules across multiple programs and users.
Types of SAP ABAP Lock Objects
1. Read/Shared Lock in ABAP
- This lock allows read-only access to the object shared
- It allows programs and users to read the data or object but not write/modify/update the same
- Thus it protects ‘read’ access to data or object
2. Write/Exclusive Lock
- This lock allows neither read nor write access to shared objects by other transactions or users
- Thus it protects ‘write’ access to data or object
3. Enhanced/Exclusive without Cumulating Lock
- This lock works similarly to write/exclusive lock
- Enhanced lock includes additional features like protecting the object or data from further access attempted by same program, transaction or user
In RAP, multiple users or processes may try to modify the same business object (BO) instance simultaneously. To prevent data inconsistencies or lost updates, you can use object locking.
-
Locks are application-level, not just database-level.
-
RAP provides framework methods to lock and unlock BOs safely.
2️⃣ How locks work in RAP
RAP distinguishes between:
-
Optimistic Locking
-
Default behavior in RAP.
-
Uses ETag / versioning of business objects.
-
Conflicts are detected after the commit, not prevented in advance.
-
-
Explicit (Pessimistic) Locking
-
You explicitly lock the object before making changes.
-
Other users trying to lock the same object will be blocked or rejected until the lock is released.
-
3️⃣ RAP Locking APIs
SAP RAP provides standard methods in the behavior implementation:
-
/IWBEP/CL_MGW_BUS_OBJ_LOCK(older) or -
/BOBF/CL_FRW_BO_LOCK(framework-level)
But in RAP, usually you do:
METHOD modify_object.

  " Get key of object to lock
  DATA(lv_key) = /bobf/if_frw_tra~get_key( is_data ).

  " Lock the object
  TRY.
      me->lock_object( iv_key = lv_key ).
    CATCH /bobf/cx_frw_lock_error INTO DATA(lx_lock).
      " Handle lock error, e.g. object already locked
      MESSAGE 'Object is locked by another user' TYPE 'E'.
  ENDTRY.

  " Perform changes here
  MODIFY ... .

  " Unlock automatically at the end of the transaction or explicitly
  me->unlock_object( iv_key = lv_key ).

ENDMETHOD.
4️⃣ Typical Locking Flow in RAP
-
Lock before edit
-
Check if object is already locked.
-
-
Perform changes
-
Update fields, call RAP APIs.
-
-
Unlock
-
Either explicitly or let the framework release at end of request/transaction.
-
5️⃣ Important Notes
-
Optimistic locking is usually enough for most RAP scenarios.
-
Pessimistic locks should be used carefully to avoid deadlocks.
-
Locking works at object instance level, not at database table row level.
-
Use
@ObjectModel.readOnlyfor fields that don’t require editing to reduce lock contention.
Configuration in BDEF:
define behavior for ZFO_BO
persistent table zfo_bo
lock master   // optional, see below
etag managed by framework
The
etag managed by frameworkactivates optimistic version-based locking.
define behavior for ZFO_BO
persistent table zfo_bo
lock master on key_field
Here, lock master tells RAP that this BO supports pessimistic locks.
The framework will check the lock table before allowing changes.
lock master on EmployeeID // <-- Enables explicit locking
METHOD modify_employee.
DATA(lv_key) = is_data-EmployeeID.
TRY.
" Lock the object instance
me->lock_object( iv_key = lv_key ).
CATCH /bobf/cx_frw_lock_error INTO DATA(lx_lock).
" Handle lock error
MESSAGE 'Employee is currently locked by another user' TYPE 'E'.
ENDTRY.
" Perform update
MODIFY ZEMPLOYEE FROM is_data.
" Unlock after update
me->unlock_object( iv_key = lv_key ).
ENDMETHOD.
me->lock_object() and me->unlock_object() are framework methods that work with lock master.
If another user has already locked this EmployeeID, cx_frw_lock_error is raised.
| Aspect | ETAG / Optimistic | Lock Master / Pessimistic |
|---|---|---|
| Mechanism | Version check | Lock table |
| Conflict detection | After commit | Before update |
| Scalability | High | Moderate |
| Use case | Most updates, OData apps | Long transactions / batch |
| Configuration in BDEF | etag managed by framework | lock master on <key> |
If you just want concurrency control for OData, ETag is enough.
If you need exclusive access, e.g., to prevent two users editing the same instance at the same time in a UI transaction, use Lock Master in your behavior definition.
ETag = Entity Tag
-
It’s a version identifier for a BO instance.
-
RAP automatically generates it for each BO row (or you can manage it yourself).
-
Think of it like a timestamp or version number: whenever the data changes, the ETag changes.
When you might need Lock Master instead
-
Long-running transactions (e.g., user opens a form for 30 minutes, editing many fields)
-
Complex multi-step processes where multiple BO instances must be locked together
-
Situations where ETag conflicts are not acceptable, and you need exclusive access upfront
Otherwise, ETag alone handles most concurrency control scenarios in RAP + OData.
-
Check Table : It is nothing but table it contains all valid entries of a particular foreign key table field. Basically the check table is used for field level validation (it restricts the field value).
(or)
The check table is the table used by system to check whether the data exist or not in foreign key table field. When ever you are trying to create the table, if you are sure the field contains some values that values only you can use in another foreign key Data Base Table.
Value Table : The value table is maintained at domain level, it is also called as domain level validation.
(or)
It is a table which contains all valid entries of a domain, this domain can be reused in multiple tables.
Difference between check table and value table :
- The check table will carry out the check for input values for the table field being entered in any application and value table will provide values on F4 help for that table field.
- The check table defines the foreign keys and is part of the table definition.
- The value table is part of the domain definition.
- check table is validation at field level.
- value table is validation at domain level.
- Value table is defined at the domain level and is used to provide F4 help for all the fields which refer to that domain.
- Also while defining a check table SAP proposes the value table as check table by default. Referring to the previous example if you tried to define a check table for the MATNR field SAP would propose MARA as the check table.
TMG:Here is the step by step process to capture the table change logs.
https://community.sap.com/t5/application-development-and-automation-blog-posts/update-and-create-events-in-table-maintenance-generator/ba-p/13408814
Step 1:
Create a custom table.

Step 2:
Click on utilities, go to table maintenance generator.

Step 3:
Enter the details of the function group, propose screen numbers and click on save, we will provide the package name.
There are two different maintenance screen types
- one step and
- Two step
one step
- In one step we will have only overview screen.
- Will able to see and maintain only through the overview screen.
Two step
- We will have two screens. overview screen and Single/Detail screen.
- overview screen will contain key fields and Single screen will contain all the other fields.

Step 4:
For TMG events, In menu Click on Environment–>Modifications–>Events

Following screen will be displayed. From the below list i have used Update and Create Events.

Update Event
Select the Update event and press enter, the following screen will appear.

Source Code
----------------------------------------------------------------------
***INCLUDE LZTEMP_DTLSF01.
----------------------------------------------------------------------
FORM update.
** -- Data Declarations
DATA: lv_timestamp TYPE tzonref-tstamps.
*-- Time stamp conversion
CALL FUNCTION 'ABI_TIMESTAMP_CONVERT_INTO'
EXPORTING
iv_date = sy-datum
iv_time = sy-uzeit
IMPORTING
ev_timestamp = lv_timestamp
EXCEPTIONS
conversion_error = 1
OTHERS = 2.
FIELD-SYMBOLS: <fs_field> TYPE any .
LOOP AT total.
CHECK <action> EQ aendern.
** -- Updated By
ASSIGN COMPONENT 'UPDTD_BY' OF STRUCTURE <vim_total_struc> TO <fs_field>.
IF sy-subrc EQ 0.
<fs_field> = sy-uname.
ENDIF.
** -- Updated On
ASSIGN COMPONENT 'UPDTD_ON' OF STRUCTURE <vim_total_struc> TO <fs_field>.
IF sy-subrc EQ 0.
<fs_field> = lv_timestamp.
ENDIF.
READ TABLE extract WITH KEY <vim_xtotal_key>.
IF sy-subrc EQ 0.
extract = total.
MODIFY extract INDEX sy-tabix.
ENDIF.
IF total IS NOT INITIAL.
MODIFY total.
ENDIF.
ENDLOOP.
ENDFORM.
Once the code is completed then we need check and activate the include.Here we need to activate the below two objects.

Create Event
Select the Create event and press enter, the following screen will appear.

Same process we have to go for the Create event.
Source Code
----------------------------------------------------------------------
***INCLUDE LZTEMP_DTLSF02.
----------------------------------------------------------------------
FORM create.
** -- Data Declarations
DATA: lv_timestamp TYPE tzonref-tstamps.
*-- Time stamp conversion
CALL FUNCTION 'ABI_TIMESTAMP_CONVERT_INTO'
EXPORTING
iv_date = sy-datum
iv_time = sy-uzeit
IMPORTING
ev_timestamp = lv_timestamp
EXCEPTIONS
conversion_error = 1
OTHERS = 2.
** -- Created On & Created By
ztemp_dtls-crtd_by = sy-uname.
ztemp_dtls-crtd_on = lv_timestamp.
ENDFORM.
Check and activate it.

Step 5:
Now To test the Update and Create events Go to Table maintenance generator ( SM30 Tcode) and Click on maintain button as per shown below.

Next, Create the data by clicking on new entries and click on save then we will able to see the Create logs.


Update the existing data then click on save, then we will able to see the Update logs.

Conclusion:
By following the above steps,we are able to see the table create and update logs for a custom table, which contains the fields “Date on which record was created” and “Name of the person who created the object”.

Table type: is a special type that can be used to define internal tables in ABAP programs. You use a table type to describe the structure and functional attributes of an internal table in ABAP. With table type we can define parameters to pass tabular data in functional modules and methods.
A table type is defined by referencing to a line type. An existing dictionary type can be used as line type such as database tables, structure, views, data elements, direct type definitions or even another table type.
Example : A foreign key links two tables T1 and T2 by assigning fields of table T1 to the primary key fields of table T2. Table T2 is then known as the check table of the foreign key.
Steps to create :
- Go to T-code se11.
- Enter table name ZSI_CHECK_TABLE

- Click on create
- Give short description and give delivery class as ‘A’

- After that Click on fields tab

- Give the field name and create the data element.
- The data element of primary key table and foreign key table must be same.

- Double click on data element, and again double click on domain the below screen will visible.
- select value range tab.
- provide fixed values and short description as per requirement.
- Enter the value table name in domain level, the value table name is nothing but table name, that means for which table you want to maintain the value table.
- Finally activate the domain, data element and table.

- Repeat the steps and create the another table called value table.
- Foreign key field domain must be same as primary key domain.
- After creating the check table create the value table same as for check table and click on field for which data element in check table gave as a value table.
- Then click on foreign key relationship button.

- When ever you click on foreign key relationship it automatically proposed a foreign key field with out giving any table name, that is the magic of creating value table.

- Finally click on copy button the values placed which is present in check table comes into the value table, so it restricts the values from the field.

- Finally provide the cardinality and foreign key field type.
- Then, successfully created the foreign key relation ship using value table.
- https://www.javatpoint.com/foreign-key-in-sap-abap#:~:text=The%20primary%20key%20field%20cannot,key%20for%20the%20second%20table.
WHAT IS PARALLEL CURSOR?
In Parallel Cursor, we first sort both inner and outer loop tables by the same key field and try to see if there is any entry in the second table inside the LOOP construct of the first table. We use READ .. WITH KEY .. BINARY SEARCH to check if an entry exists in the second table. Here we use the value of SY-TABIX record to LOOP on the second table using LOOP .. FROM index.. syntax.In simpler terms, we Read the Key of the inner table, Loop from that key when entry is found and exit the table when keys don’t match.
SY-TABIX is set back to what it was before + 1 iteration. But the issue arises in debugging. Its value keeps changing and you won’t know what row you have started reading the inner table. Therefore, it would make more sense to use a Local variable to store the SY-TABIX value before looping through the Inner table.
PARALLEL CURSOR WITHOUT USING READ STATEMENT
This is a slightly modified version of the Parallel Cursor. To speed up the performance of Nested LOOP, we will exit the inner LOOP when both the keys don’t match, by saving the LOOP index in a variable. This index variable would be used in the LOOP construct to start the next iteration of the LOOP. Here, however, this index variable is set to value 1. This removes the dependency of the READ statement and consecutively boosts up the performance.
MATCHCODE in SAP and Transaction Codes (Tcodes)
Updated May 18, 2018
A MatchCode is a tool to search for data records in the system. MatchCodes are an efficient and user-friendly search aid for cases where the key of a record is unknown. It consists of two stages one is Match code object and the other is Matchcode ID. A MatchCode object describes the set of all possible search paths for a search term. Matchcode ID describes a special search path for a search term.
For many entry fields, but not all, SAP provides a search function called a MatchCode. MatchCodes allow you to select a value from a list or search for a value by categories of data if there are many possibilities.
To display the MatchCode button, click in an entry field. The MatchCode appears on the right of the field.
The system helps you to access the Match codes(search help) in the following ways:
- Keeping the cursor in the field and then pressing F4.
- Keeping the cursor in the field clicking the right button on the mouse and then selecting possible entries.
- Keeping the cursor in the field and then clicking on the magnifying glass.
INTERACTIVE REPORT AND ITS EVENTS:
INTERACTIVE REPORT : A report which can generate one basic & up to 20 interactive lists is called an interactive report.
So first list is called basic list & next lists are called interactive lists.
EVENTS IN INTERACTIVE REPORTS:
1. INITIALIZATION.
2. AT SELECTION-SCREEN.
a. AT SELECTION-SCREEN ON <FIELD>.
b. AT SELECTION-SCREEN OUTPUT.
c. AT SELECTION-SCREEN ON VALUE-REQUEST FOR <FIELD>.
3. START-OF-SELECTION.
4. TOP-OF-PAGE.
5. END-OF-PAGE.
6. AT LINE-SELECTION.
7. AT USER-COMMAND.
8. TOP-OF-PAGE DURING LINE-SELECTION.
AT LINE-SELECTION:- This event is used to generate an interactive list when ever
particular in the out is double clicked.
TOP-OF-PAGE DURING LINE-SELECTION:- This event is used to write something on top of every page of individual secondary lists. Also Top-of-page event is used to write something on only basic list.
AT USER-COMMAND:- This is used to handle user action on the screen whenever standard menu bar & application tool are changed.
So these interactive lists we take the help of HIDE table. Also Hide is an intermediate memory area which is used to hold the values that are used for generation of next secondary list.HIDE statement should be used after write statement. Then only you will get correct results. Other wise you will get wrong values. HIDE table values you can not see even in debug mode.
SAP ABAP Classical Reports
SAP ABAP Classical Reports are the most basic ABAP reports that contain both selection screen and an output screen. Classical reports are executed based on events, and not executed on a line-by-line basis. Classical reports are non-interactive reports. Basically, they consist of one program that creates a single list.
The following SAP training tutorials guides various events in classical reports, provide the syntax for each and then present a simple programming example of a Classical Report.
Events in Classical Reports.
The following are the list of Events in Classical Reports.
1. Load-of-program: The Load-of-program event loads the program into memory for execution. Always, Load-of-program is the first event in execution sequence.
2. Initialization: Initialization is an event that is used for initialize variables, screen values and other default actions.
3. At Selection-Screen output: One of the selection screen events is used to manipulate dynamic selection-screen changes.
4. At Selection-Screen on field: It is used to validates the screen input parameter.
5. At Selection-Screen on value request: This selection screen event allows for a value help or field help for an input field.
6. At Selection-Screen on help request: This selection screen event enables function key F1 help for a input field.
7. At Selection-Screen: Selection screen validates various input fields.
8. Start-of-Selection: This is the default event in any ABAP program and is activated whether we use it explicitly or not .
9. End-of-Selection: This event signals that event of what has been initiated by the start-of-selection event.
10. Top-of-Page: This event is used to print the same heading for all pages.
11. End-of-Page: This event is used to print the same footer for all pages.
TMG:
https://www.stechies.com/table-maintenance-generator-events/
Table Maintenance Generator is a tool used to customize the tables created by end users and can be changed as required, such as making an entry to that table, deleting an entry etc.
In other words, table maintenance generator is a user interface tool which is used to change the entry of the table or delete an entry from the table or create an entry for the table.
Prerequisite
To make this feature work care should be taken while creating the database table that in the ‘Delivery and Maintenance’ tab, the ‘Table View Maint.’ should have the “Maintenance allowed” property defined.

Transaction Codes
SE54: Generate Table Maintenance Dialog
SE55: Table view maintenance DDIC call
SE56: Table view display DDIC call
SE57: Deletion of Table Maintenance
SM30: Maintenance Table Views:
Implementation of table maintenance generator for a custom table
Go to SE11 and create a table with the fields as per the requirement.
In table change mode, click on Utilities and then click on Table maintenance generator.

Following screen will be displayed for setting up the Maintenance generator

Following are the available options, choose them accordingly
Authorization Group: If the table needs to be maintained by only particular group of people, then the Authorization group needs to be filled otherwise fill it as NC. To maintain the authorization group refer to SU21.
Function group is the name to which the generated maintenance modules will belong to.
Generally Function Group name can be same as table name.
Maintenance screens: Maintenance can be done in 2 ways.
1. Maintenance and Overview both on one screen
2. Maintenance on one screen and Overview on another screen.
Provide the desired screen numbers.
After saving the changes, go to SM30 for maintaining the table.

Modifications Available in Table Maintenance
The Function Group created will be having the code and screens used in maintenance.
We can alter the way Maintenance data and screens are viewed by making the appropriate changes in the Function Group and its screens.
Screen Alterations
Maintenance screen can be altered in a way that, if a field needs to be non-editable or default name appearing on the maintenance screen for any field needs to be changed then following steps can be used to do the same
Go To Environment > Modification > Maintenance Screens

A field can be made non editable by simply unchecking that input checkbox for that field.

So the maintenance screen will appear like the one below

Similarly, the screen name of any of the fields appearing on the maintenance window can also be changed by changing the Name on the layout window of that field.

Table Maintenance Events
The value to be displayed on the maintenance screen for any field can also be altered as per the requirement like for every new entry in the table one of the field should have the constant value appearing automatically. For this purpose, the event needs to be chosen which performs the action. In this case event “05 creating a new entry”.
List of Events available in Table maintenance
01 Before saving the data in the database
02 After saving the data in the database
03 Before deleting the data displayed
04 After deleting the data displayed
05 Creating a new entry
06 After completely performing the function ‘Get original’
07 Before correcting the contents of a selected field
08 After correcting the contents of a selected field
09 After getting the original of an entry
10 After creating the header entries for the change task (E071)
11 After changing a key entry for the change task (E071K)
12 After changing the key entries for the change task (E071K)
13 Exit editing (exit main function module)
14 After lock/unlock in the main function module
15 Before retrieving deleted entries
16 After retrieving deleted entries
17 Do not use. Before print: Event 26
18 After checking whether the data has changed
19 After initializing global variables, field symbols, etc.
20 after input in date sub screen (time-dep. tab. /views)
21 Fill hidden fields
22 Go to long text maintenance for other languages
23 Before calling address maintenance screen
24 After restricting an entry (time-dep. tab./views)
25 Individual authorization checks
26 Before creating a list
27 After creation or copying a GUID (not a key field)
28 After entering a date restriction for time-dep. views
AA Instead of the standard data read routine
AB Instead of the standard database change routine
AC Instead of the standard ‘Get original’ routine
AD Instead of the standard RO field read routine
AE Instead of standard positioning coding
AF Instead of reading texts in other languages
AG Instead of ‘Get original’ for texts in other languages
AH Instead of DB change for texts in other languages
ST GUI menu main program name
AI Internal use only
For selecting the events follow the path as
Environment > Modification > Events


Click on New Entries tab and Choose 05.

In form routine enter “FETCH_VALUE” and click on EDITOR.

Go to the events and in the form routine: FETCH_VALUE, write the desired code:
Like : ZCHC_ORD_REL-SYUNAME = sy-uname.
Check the same by adding some entries through SM30:

…
SAP Table Maintenance Generator
SAP Table Maintenance Generator (TMG) is a tool, used to create a table maintenance program, which can be customized, to be used by the end users to maintain the table for example, user can create a new entry in the table, can change the existing data, and can delete the data.
To create Table Maintenance Generator (TMG) you can go to SE11 t-code and then enter the table name and then click on change button. Go to Utilities -> Table Maintenance Generator.
Alternatively, you can access directly by using transaction code - SE54.
Why we need to use Table Maintenance Generator?
In production systems, the end-users generally won't be having access to SE11 or SE16 transaction code. So, if they need to maintain this table they need an alternate way to do so.
The benefit of Table Maintenance Generator is that the restriction can be put on each field column and also gives end-users to change or modify mulitple entries at the same time. The table maintenance events allows to change the generated table maintenance at specified position.
You can go to menu "Environment->Modification" where there is an option for Screen Maintenance, User Interface, Events, and Source Code. Uisng an events for example - you an put additional restrictions and warnings, or you can display message before SAVE, DELETE or CHANGE. There are several pre-define standard events available by SAP which you can use to enhance the functionality of your generated table maintenance program.
Available Events
What are the different Maintenance type?
There are two different Maintenance type - One Step and Two Step method.
1. One Step Method - In one step method there is only one overview screen. In single step over view screen number is compulsory but single screen is not required. In this case single screen number will get ignored. You can enter any screen number other than 1000, which is reserved for selection screen. In One Step Method, you will be able to see and maintain only through overview screen.
2. Two Step Method - In two step method there is two screens. Over View Screen and Single Screen (Detail Screen). Here both the screen (Overview and Single) number is required to enter. In this the overview screen contains only the key fields and single screen contains all the fields. On single screen you can only maintain screen, Like Delete and Insert. You cannot update from single screen. From overview screen you can delete and update. When you press 'New Entries' button then it will take you to Single Screen. This happen only when you had selected Two step method.
Important Points to Note
- Table maintenance is required to maintain table Via Transaction code - SM30 and SM31. It is not used for transaction code SE16 and SE16n.
- Transaction code SE16 and SE16n can be used directly if you have set "Display/Maintenance Allowed" within 'Delivery and Maintenance' Tab in t-code SE11.
- If you have set "Display/Maintenance Allowed with Restrictions" or "Display/Maintenance Not Allowed" then you won't be able to insert or maintain data through SE16 or SE16n. Nor you will be able to access through SM30 or SM31. You will get error message in SE16 as "Table maintenace not allowed for table 'XXXX' ". In SM30 or SM31 you will get the error message as "View/table 'XXXX' can only be displayed and maintained with restrictions".
- If you make changes in the table then you will have to re-adjust or to re-create the Table maintenance Generator
Adjusting Table Maintenance Generator without re-generating it, when Table Structure changes
Purpose:
Suppose we have a table in the dictionary and it has a maintenance generator which contains many events and lot of features (display a field as drop down, check box or field header text) incorporated manually in the function group of the maintenance generator. At this moment if the table structures changes and it requires one extra field to be appended and maintenance generator needs to be there as it was previously with the amended of the new field then changing the table structure and re-generating the maintenance generator will not provide the solution. If we re-generate the maintenance generator after changing the table structure then it will incorporate the new field but all the events and other features will be deleted from the maintenance generator. So same features and events needs to be coded again.
This can be avoided by adjusting the maintenance generator manually and not re-generating it using the following steps:
Step1:
Create a table ZTEST_EMP using tcode SE11 with a maintenance generator.

Now Utilities->Table Maintenance Generator and create the Maintenance Generator:

Now from SM30 tcode we can create new entries to the table:

Display table ZTEST_EMP:

Step2:
Change the table structure with the addition of new field ‘EMP_AGE’ and activate it:

Now if we display the table it will also display the new field with initial value:

But the table maintenance generator will not contain the new field:

Step3:
Now we will adjust the Table Maintenance Generator so that this additional field is added and other functionalities in the Table Maintenance Generator remains intact.
Get the Function Group from the Table Maintenance Generator Display:


Go to tcode SE80 and open the function group and select the screen number and click on Layout from toolbar.

This Design Screen will appear:

Add the extra column (input/output field) manually:

Name the new column as the same updated in the table structure.

Add the column header text as follows: Name the header text field as- *ZTEST_EMP-EMP_AGE


Save and Back. Go to Flow Logic tab and add the following line indicated:

Go to Element List->General Tab: Tick the red marked field as dictionary field.

Save it. Following pop up will be prompted. (Select your choice accordingly and click ok)

Then the following popup will come. (Click as per your requirement. Here we choose yes as we want new table field to be in Table Maintenance Generator)

Finally Activate the Table Maintenance Generator. If activated successfully then go to tcode SM30 to maintain data.

We will change Employee age as 30 and save the record. In the table display we can see that age is updated.

The main update technique for bundling database changes in a single database LUW (Logical Unit of Work) is to use CALL FUNCTION <update_function> IN UPDATE TASK.
During program execution, when the system reaches the statement, CALL FUNCTION <update_function> IN UPDATE TASK , the function module is not executed immediately, but is scheduled for execution in a special work process (update work process). For this purpose, the name of the function module including the passed actual parameters is stored as a log record in the database table VBLOG.
Now when in program it reaches COMMIT WORK statement, it looks into that table and calls each registered functions and updates the database tables (for the corresponding INSERT/MODIFY/UPDATE/DELETE statements written in the function module).
The actual execution is triggered by the statement COMMIT WORK. The formal parameters of the function module receive the values of the actual parameters from table VBLOG. A function module that is registered several times will also be executed several times with the respective parameter values.
If a COMMIT WORK statement is not executed after registration of a function module during execution of the current program, the function module is not executed and is deleted from table VBLOG at the end of the program.
Purpose : The aim is to either COMMIT all the changes at once, or ROLLBACK them all.
If COMMIT statement is not encountered , it clears VBLOG table (so no FM is registered for change anymore) and continues the program.
Additional Info : The transaction for update requests management is SM13.
Update management is used for the following:
- Display update requests
- Analyze problems pertaining to the update
- Test and debug canceled update requests
- Display and reset the status of update requests
- Delete update requests
- Display statistics on updates
Lock objects:
https://www.stechies.com/what-is-lock-objects-and-types-of-lock-objects/#:~:text=The%20lock%20object%20in%20SAP,and%20the%20type%20of%20lock.
What is Lock Objects in SAP ABAP
Updated Apr 29, 2023
Lock object in SAP ABAP is used to prevent multiple users from making changes to the same piece of data simultaneously. A lock is a mechanism that prevents a user from modifying a record that is already being accessed by another user.
A lock object in SAP is defined using the Lock Object Administration t-code SM12 and is used to control access to specific data records. When a user tries to access a locked record, SAP will either block the access or provide a message indicating that the record is already locked.
The lock object in SAP is based on a locking mechanism known as enqueuing. When a user creates a lock, the lock object creates an entry in the lock table with the name of the object being locked, the user ID of the user who created the lock, and the type of lock. When another user tries to access the locked object, SAP will check the lock table to see if a lock exists for that object. If a lock exists, the user will either be blocked or given a message indicating that the object is already locked.
Types of Lock Object
There are two types of lock objects are available, DEQUEE, ENQUEE:
ENQUEUE: This is the mode that is used to lock an object. When a lock is created, an entry is made in the lock table, which prevents other users from accessing the locked object until the lock is released.
DEQUEUE: This is the mode that is used to release a lock. When a user releases a lock, the entry is removed from the lock table, and other users can then access the object.
Both the ENQUEUE and DEQUEUE modes are required for lock objects to function properly. The ENQUEUE mode is used to create the lock, and the DEQUEUE mode is used to release the lock. If a user creates a lock and does not release it, the object will remain locked indefinitely, preventing other users from accessing it.
Lock Mechanism
The lock mechanism in SAP allows programs to prevent conflicts when accessing the same data record. There are two main functions accomplished with the lock mechanism:
Communication: A program can communicate with other programs about data records that it is reading or changing. By locking the data record, the program signals to other programs that it is currently accessing the data and prevents them from accessing it until the lock is released.
Prevention: A program can prevent itself from reading data that has just been changed by another program. By requesting a lock on the data record, the program ensures that it has exclusive access to the data until the lock is released. This prevents any other programs from modifying the data and ensures that the program is working with the most up-to-date version of the data.
To request a lock, a program generates a lock request, which is sent to the Enqueue server. The Enqueue server creates a lock entry in the lock table and sets the lock, allowing the program to access the data. Once the program has finished accessing the data, it releases the lock, and the lock entry is removed from the lock table, allowing other programs to access the data.
Locking Mode
In SAP, there are severl locking modes available to control data access by multiple users. The most commonly used locking modes are:
- Exclusive Lock: The locked data can be read or processed by one user only.
- Shared Lock: Several users can read the same data at the same time, but as soon as a user edits the data, a second user can no longer access this data.
- Exclusive but not cumulative lock: Exclusive locks can be requested by the same transaction more than once and handled successively, but an exclusive but the not cumulative lock can only be requested once by a given transaction. All other lock requests are rejected.
- Update Lock: This mode is used when a user needs to modify a data record, but only after verifying that no other user has modified the data since it was last read. It allows the user to exclusively access the data record for the purpose of verifying that the data has not been modified by any other user, but does not prevent other users from reading the data.
- Intent Lock: This mode is used to indicate the intention of a user to lock a data record. It allows the user to signal to other users that it intends to modify the data, preventing them from acquiring an incompatible lock.
SAP Buffers
SAP Buffers
Purpose
Each SAP instance (application server) has its own buffers. These buffers are also known as client caches because they are implemented on the client, that is, the application server. SAP buffers occupy memory areas that are local to the work process, and in individual shared memory segments that can be accessed by all work processes. These memory areas are executed for the application server.
Some of the shared memory segments in an SAP System are grouped into one shared memory segment known as a pool. This is done to meet the operating system limits on the number of shared memory allocations per process. In most operating systems, you can allocate as many shared memory segments as required. The limits depend on the kernel configuration. The AIX operating system, for example, allows 10 shared memory segments per process.
SAP buffers store frequently-used data, and make this data available to the local application server instance. This helps to reduce the number of database accesses, the load on the database server (it does not need to be accessed repeatedly to obtain the same information), and network traffic. As a result, system performance is considerably improved.
The data that is buffered includes ABAP programs and screens, ABAP Dictionary data, and company-specific data. Typically these remain unchanged during system operation.
You can change, or tune, the sizes of buffers to optimize performance for a particular hardware configuration. There are several ways to tune buffers. As there are many constraints to consider when change the buffer size, several difficulties may arise.
You can use table buffering to fine-tune applications, that is, some or all of the contents of infrequently changed tables can be held in local buffers.
SAP Buffers
Program Buffer | This buffer occupies a whole shared memory segment. |
Generic Buffer Screen Buffer | These buffers are held in a shared memory pool. All work processes can access this pool. |
Roll Area | Local work process buffers. Only one work process can access these buffers at a time. |
There are mainly three types of tables and three types of Structures in SAP. I have provided the details of those tables and structures along with examples in this document.
1.Transparent table:
There is a physical table on the database for each transparent table. The names of the physical tables and the logical table definition in the ABAP/4 Dictionary correspond.
All business data and application data are stored in transparent tables.
Ex: Purchase Order Header Data- EKKO
2. Pooled Table:
Pooled tables can be used to store control data (e.g. screen sequences, program parameters or temporary data). Several pooled tables can be combined to form a table pool. The table pool corresponds to a physical table on the database in which all the records of the allocated pooled tables are stored. This is for internal purposes, such as storing control data or update texts etc.
Ex: Material Info Record (Plant-Specific)- A017
3. Cluster Table:
Cluster tables contain continuous text, for example, documentation. Several cluster tables can be combined to form a table cluster. Several logical lines of different tables are combined to form a physical record in this table type. This permits object-by-object storage or object-by-object access. To combine tables in clusters, at least parts of the keys must agree. Several cluster tables are stored in one corresponding table on the database. This is for internal purposes, such as storing control data or update texts etc.
Ex: Accounting Document Segment- BSEG
4. Structure:
A structure (structured type) consists of components (fields) whose types are defined. A component can have an elementary type, a structured type, a table type or reference type
Structures are used specially to define the data at the interface of module pools and screens and to define the types of function module parameters.
Structures that are used more than once can be changed centrally because they were defined centrally. The active ABAP Dictionary makes this change at all relevant locations. ABAP programs or screen templates that use a structure are automatically adjusted when the structure changes.
Ex: MEPO1220- Fields for Screen 9101
5. Append Structure:
An append structure defines a set of fields that belong to another table or structure but are treated in the correction management as a separate object.
Append structures are used to support modifications.
Ex: ISAUTOLAB- IS AUTOMOTIVE Enhancements in EKPO
6. Generated view Structure:
In activation a structure is generated for a view. This structure serves as interface for the runtime environment. It does not generally appear in the ABAP/4 Dictionary. This is for internal purposes, such as storing control data or update texts etc.
Ex: V_T438M_B- Direct Procurement
We can see the type of table or structure by displaying the details with SE11 T Code for a single entry and for multiple tables or structures, we can get from table SAP Tables-DD02L. Both the methods are explained below
1.Through SE11 Transaction Code:
Input Screen: Input the Table which you want to check and click on display icon as shown below

Output Screen: The table or structure type will be visible as shown in the highlighted box
2. Through Table DD02L: This method will be helpful to know the table types of many tables
Input Screen:

Output Screen:

SAP ABAP internal table is a dynamic sequential dataset in which all records have the same structure and a key. The internal tables is used as a arrays. You can read individual records of internal table using either the index or the key using READ statement. You can also loop the internal table to read all the records one by one.
The data type of an internal table is fully specified by its line type, key, and table type.
There are three types of internal table. They are - Standard Tables, Sorted Tables, and Hashed Tables.
The difference between standard tables, sorted table and hashed tables are -
Standard Table
- It has an internal linear index.
- The system can access records either by using the table index or the key.
- The response time for key access is proportional to the number of entries in the table.
- You cannot specify a unique key. It has always non-unique key.
Sorted Table
- Sorted table are always saved sorted by the key. They also have an internal index.
- The system can access records either by using the table index or the key.
- The response time for key access is logarithmically proportional to the
number of table entries, since the system uses a binary search.
- The key of a sorted table can be either unique or non-unique. When you
define the table, you must specify whether the key is to be UNIQUE or NON-UNIQUE.
Hashed Table
- Hashed tables have no linear index. You can only access a hashed table using its key.
- The response time is independent of the number of table entries, and is constant,
since the system accesses the table entries using a hash algorithm.
- The key of a hashed table must be unique.
- When you define the table, you must specify the key as UNIQUE.
What is Extracts? How it is different from internal table?
Extracts are dynamic sequential datasets in which different lines can have different structures. Each ABAP program may currently only have a single extract dataset. You cannot access the individual records in an extract using key or index. Instead, you always process them using a loop.
How to suppress the assignment of lines in LOOP statement?
If you do not want to transfer the contents of the internal table line to a work area or do not want to assign them to a field symbol, you can use the following statement:
LOOP AT itab TRANSPORTING NO FIELDS condition.
You can define following thing in domain-
In Definition Tab
1. Data Type
2. No. Of Characters
3. Decimals
4. Output length
5. Conversion Routine
6. Sign (a check box)
7. Lowercase (a check box)
In Value Range Tab
1. F4 Help fixed Ranges
2. Value Table
Q. What is value range in domain? What type of value range you can define?
A. In value range you can define a fix value for F4 help. There are two type of value range you can define.
1. Single Values and
2. Intervals.
The value range of a domain can be limited by defining fixed values. In this case, only the values entered in the fixed values are possible for all the table fields referring to this domain. The fixed values can be single values or intervals.
Note: You can only define fixed values for domains of data types CHAR, NUMC, DEC, INT1, INT2 and INT4.
Elementary type is define by the built-in data type, field length and decimal places. Whereas Reference type defines the type of reference variable in ABAP program.
Data Element is used for defining -
1. Data Type
2. Field Label
3. Search Help
4. Parameter ID
5. Change document flag
6. Further Characteristics
Important Notes -
You cannot use domain to define parameter or select-options or variable or even you can't define the type from the domain. For example, MENG13 is a domain, and you can't define this -
TYPES: p9 TYPE MENG13. [It will throw error]
You can define variable either using data element or you can use table or structure component. Like EDIDD is an structure, from this you can define both variable and define the TYPES as well.
TYPES: p10 TYPE edidd-docnum. [This will work perfectly]
- Using type and like both will give you F4 and F1 help (Checked in ECC 6.0), for example -
PARAMETERS: p4 TYPE VBAK-FKARA. [FKARA is a field and data element name]
PARAMETERS: p5 LIKE VBAK-FKARA.
Select-options: p6 FOR VBAK-VBELN. [VBELN is a field and data element name]
PARAMETERS: p7 TYPE WERKS_D. [WERKS_D is a data element and have a search help H_T001W_C attach]
PARAMETERS: p8 LIKE MARC-WERKS. [WERKS is a field and a name of domain and not data element]
PARAMETERS: p13 TYPE MARC-WERKS. [This will give you both F1 and F4 help, since search help - H_T001W is attach to table MARC]
All these above will give you F4 and F1 help.
Note - WERKS_D is not a structure but a data element and domain. You can't use statement -
PARAMETERS: p19 LIKE WERKS_D.
This will throw an error. Even writing below statement for data declaration it will give you the same error -
DATA: p19 LIKE WERKS_D. But you can use the below statement without any error -
DATA: p19 LIKE marc-WERKS.
DATA: p20 LIKE WERKS. [Note - WERKS is not data element but a structure and domain]
DATA: p21 TYPE WERKS.
Or can use MATNR with TYPE without any error, for example -
DATA: p22 TYPE matnr. [Note - MATNR is a domain and data element]
Also you can use - TYPES: p19 TYPE matnr. [Without any error]
But you can't use the below statement -
DATA: p23 LIKE matnr. [This gives you an error]
Difference between TYPE and LIKE is that you cannot reference an internal tables, strings, references, or structures as component using LIKE statement but you can refrence this with TYPE statement.
1. Transparent Table - A transparent table in the dictionary has a one-to-one relationship with a table in the database. Its structure in R/3 Data Dictionary corresponds to a single database table. For each transparent table definition in the dictionary, there is one associated table in the database. The database table has the same name, the same number of fields, and the fields have the same names as the R/3 table definition. They are used to hold application data. Application data is the master data or transaction data used by an application.
2. Cluster Table - A cluster table is a SAP Proprietry which has a many-to-one relationship with a table in the database. Many cluster tables are stored in a single table in the database called a table cluster. It holds many cluster tables. In cluster table, tables have a part of their primary keys in common.
A cluster is adavantages in the case where data is accessed from multiple tables simultaneously and those tables have at least one of their primary key fields in common. Cluster tables reduce the number of database reads and therby improve performance.
3. Pooled Table - A pool table is also a SAP Proprietry which has a many-to-one relationship with a table in the database. For one table in the database, there are many tables in the Data Dictionary. The table in the database has a different name than the tables in the DDIC, it has a different number of fields, and the fields have different names as well.
Restrictions on Pooled and Cluster Tables: -
1. Pooled and cluster tables are generally used only by SAP and not used by developers,
due to proprietry format of these tables within the databse and technical
constratints to use within ABAP/4 programs.
2. Secondary Indexes cannot be created on Pooled and Cluster Tables.
3. Can't be use ABAP/4 SQL construct 'Select Distinct' or 'Group By'.
4. Native SQL cannot be used on Pooled and Cluster Tables.
5. Field names cannot be specify after the 'Order By' clause. 'Order By' with primary key is only allowed.
Note: You can't use a pooled table with a join. In case of Table Pool and Table Cluster, within a technical setting you can only change SIZE.
Important Note on Pooled Table and Cluster Table
1. For creating pooled table or cluster table you will have to assign the Table pool
or Table cluster in the 'Delivery and Maintainence' tab.
2. You can set technical setting as well like in transparent table.
3. In pooled table, you cannot use indexes and append structure features.
4. In cluster table, you cannot use indexes features but can use append structure.
5. For cluster table you will have to define a key which will match to table cluster
to which it has been assigned.
6. For both pooled table and cluster table it is recommended to use MANDT client
field, but this is not mandatory.
7. Both pooled table or cluster table exist physically in database.
8. To access pooled table or cluster table you can write a direct OPEN SQL query
(Not NATIVE) same as you write for transparent table.
The Differences Between Pooled Table and Cluster Table
1. In pooled table both INDEX and APPEND STRUCTURE is disabled while in
cluster only INDEX is disabled.
2. Cluster table must have one key common but this is not the case for pooled table.
Following are the points to be noted further -
1. Table Pool and Table Cluster contains predefine fields and keys which you can change.
2. You can define a technical setting for both but in this you have only option to change
the SIZE and nothing else (like data class, or buffer settings, or log option) you can set.
Example of Cluster Table
BSEG - Accounting Document Segment
EDID4 - IDoc Data Records from 4.0 onwards
BSET - Tax Data Document Segment
BSEC - One-Time Account Data Document Segment
BSED - Bill of Exchange Fields Document Segment
Example of Table Cluster
RFBLG - Cluster for accounting document
Example of Pool Table
A004 - Material
A005 - Customer/Material
T001S - Accounting Clerks
Example of Table Pool
KAPOL - Condition pool: Prices and surcharges and discounts
To create secondary index go to SE11 table creation screen and then go to Indexes. Each index has a unique one to three character identifier, or id in R/3. An index can consist of more than one field. The ID 0 is reserved for the primary index.
The index name on the database adheres to the convention "< Table_Name >/< Index_ID >".
Important Questions
Q. How you use the secondary index in the ABAP program?
A. There are two ways where secondary index is used:
1. In SELECT statement with WHERE clause.
2. READ TABLE statements write INDEX < indexname >.
Q. What is the use of 'table index'?
A. Index is used for faster access of data base tables.
Control table - is a type of delivery class in DDIC which has separate key areas for SAP and customer.
For example - Table TSADRV is a control table.
Note: The Control Tables specify that it is the table where data is not changed frequently and pertains to information for the flow of the system.
The following are the delivery classes:
A: Application table.
C: Customizing table, maintenance by customer only.
L: Table for storing temporary data.
G: Customizing table, entries protected against overwriting.
E: Control table, SAP and customer have separate key areas.
S: System table, maintenance only by SAP.
W: System table, contents can be transported via own TR objects.
Describe Help Views
Help views can be used in search helps as a selection method. For Example - You may have to create a help view if a view with outer join is needed as selection method of search help.
Important points to note about Help views
- It implements an outer join.
Search Help - In a simple word, A search help is an object of the ABAP Dictionary with which input helps (F4 helps) can be defined. It helps to define the standard input help process. There are two types of search help - Elementary search help and Collective search help. There is also one serach help known as Append search help which can be used to enhance collective search help.
1. Elementary search helps create a single search path for providing the possible entries (F4).
2. Collective search helps combines several elementary search helps. Hence, it provides more than one alternative search paths for possible entries.
Q. What you can define in Collective Search Help?
A. Following things are define in collective search help-
- Search help exit
- Search help parameter and
- Elementary search help
Q. What is hot key for search help?
A. The hot key permits the user to select elementary search help from the collective
search help directly in the input field with the short notation using either letters or digits.
Using transaction code SE11 you can create search help. This search help has to be assigned to the field for which this input help is required. There are four ways you can assign the search help -
1. By attaching the search help to a data element
2. By attaching the search help to a check table
3. By attaching the search help to a table field
4. By attaching the search help to a screen field
Scenario-1: In case if more than one search help is assigned to the field the conflicts in calling the search help is resolved by the hierarchy of search help. So when a input help is called for the field, first it checks if the search help is attached on the screen field or not. Here it also a case if there is a program help written with PROCESS ON VALUE-REQUEST or not else it looks for the search help attached to the screen field. If no serach help available here then it looks for the input help attahed using FIELD SELECT or FIELD VALUES.
Scenario-2: If the above first level if the field could not able to find the input help then it further looks for the search help defined to the tabel field.
Scenario-3: If no search help define here, it tries to call the search help define at a check table. If at check table it finds the search help then it displays else it displays the key values of the check tables.
Scenario-4: Still there is no search help is define at the above level the system looks for the search help define at the data element. If still the search help is not define at data element, the fixed values of domain are displayed.
The technical settings of a table is use to define how the table will be handled when it is created in the database. That is whether the table will be buffered or not, what type of buffering can be done, or if changes to table data records will be logged or not.
There are different parameters that you can set:
1. Data class - The data class defines the physical area of the database (tablespace) in which the table should be created.
2. Size category - The size category defines the size of the extents created for the table. When the table is created in the database, the required information about the memory area to be selected and the extent size is determined from the technical settings.
3. Buffering permission - The buffering permission defines whether the table may be buffered or not. There are three different types of buffering permission. They are - 'Buffering not permitted', 'Buffering permitted but not activated', and 'Buffering activated'. The buffering type is used to define how we want to buffer the table and which table records should be loaded into the application server buffer when a record from the table is retrieved.
4. Buffering type - If the table may be buffered, you must define a buffering type (full, single-record, generic). The buffering type defines how many table records are loaded into the buffer when a table entry is accessed.
5. Logging - This parameter defines whether changes to the table entries should be logged. If logging is switched on, each change to a table record is recorded in a log table.
Q. What is delivery class?
A. The delivery class controls the transport of table data for installation, upgrade, client copy and when transporting between customer systems. The delivery class is also used in the extended table maintenance.
Q. What is database utility?
A. The database utility is the interface between the SAP Data Dictionary and the relational database (Like SQL, Oracle etc) underlying the SAP System. You can go to database utility using transaction code - SE14 or using SE11. The database utility allows you to edit (create, delete and adjust to changes to their definition in the ABAP Dictionary) all the database objects that has been derived from objects of the ABAP Dictionary.
Foreign Keys
Q. What are the different kinds of foreign key in SAP?
A. There are four types of foreign keys in SAP. They are:
1. Compound foreign key
2. Generic foreign key
3. Constant foreign key
4. Adapted foreign key
Q. What are the technical requirements for creating a foreign key?
A. There are following two technical requirements for creating a foreign key-
1. The check must occur against a field within the primary key of the check table, and
2. The domain names for the foreign key field and the check field must be the same, i.e. the data element for the foreign key should be similar.
Q. What types of foreign keys field describe?
A. It describes what the foreign key fields mean in the foreign key table. Wether it contains key fields or/and candidate fields.
Q. What are the three types of foreign key fields can be defined?
A. The following three types of foreign key fields can be defined:
1. No key fields/candidates
2. Key fields/candidates
3. Key fields of a text table
Q. What is text table?
A. Table T1 is a text table of table T2 if the key of T1 comprises the key of T2 and an additional language key field . The key of check table has an additional language key field, in respect what foreign key fields has.
Q. What is an aggregate object in DDIC?
A. An aggregate object is composed of more than one table. For example 'View' is an aggregate object. To include the table in an aggregate object you must specify the cardinality while creating foreign key, else you won't be able to include.
Control break processing in a internal table loop is used to execute statements written within the block AT and END AT, when the control structure changes. The AT statements (Begining of the blocks) determine the control break at which the statements written within the blocks are executed. Within these statement blocks, the SUM statement can be use to total the numeric components of a control level.
The prerequisite for using control break statements is that the internal table must be sorted in the exact order of the components of its row type according to the processing sequence in which the LOOP loop reads the rows of the internal table.
The control break "ON CHANGE OF - ENDON", can be used in any loop, not just LOOP... ENDLOOP. It can also be used in WHILE ... ENDWHILE.
There are Five control break statements -
1. At First / End At
2. At Last / end At
3. At New / End At
4. At End Of / End At
5. On Change Of / EndOn
Q. What is the difference between 'At New / End At' and 'On Change Of / EndOn'?
1. 'On Change Of' can be used in any loop construct, not just 'Loop At'.
2. A Single 'On Change Of' can be triggered by a change within one or more fields named after of and separated by OR.
3. When used within a loop, a change in a field to the left of the control level does not trigger a control break.
4. When used within a loop, fields to the right still contain their original values; they are not changed to contain zero or asterisks.
5. You can use 'else' statement between 'On Change OF' and 'End On'. You can also use ELSEIF statements in conjunction with special implementation of ON, but should always try to avoid this because they may not be supported in future.
6. You can use it with 'Loop At' IT WHERE clause��
7. You can use 'SUM' with 'On Change Of'. It sums all numeric fields except the one(s) named after Of.
8. Another difference is while using 'at new' in case if you code any write statements between 'at new' and 'end at' the value for the numeric fields will be returned as 0 and that of no numeric fields will be returned as *(asterisk). But in on change of the original values will be returned.
NOTE: Use the 'At First' and 'At Last' statement to perform during the first or last pass of internal table. These statements can only be used within 'LOOP AT'; they cannot be used within select.
What is the difference between collect and sum?
Following are the differences -
- COLLECT statement is used to sum the value on a default key fields in the work area. The default key is composed of the values from all fields of type c, n, d, t, and x. Where the SUM statement is used to sum the value to the right of control level. The key is formed with the control level defined on the control break processing statement.
- SUM statement is used with the control break AT...ENDAT processing statement though COLLECT statement do not so.
- In the COLLECT statement, the system searches the body of the internal table for a row that has the same key as the key in the work area. If it doesn't find one, the row is appended to the end of the table. If it does find one, the numeric fields (types I, p, and f) in the work area are added to the corresponding fields in the found row.
While SUM, calculates a total for the current value of the control level that contains it. It finds all rows that have the same values within the control level field and all fields to the left of it. It sums each numeric column to the right of the control level. It places the totals in the corresponding fields of the work area.
The ABAP SUBMIT report statement is used to starts the program. But you can only start programs with type '1' (Executable Program only) using SUBMIT. If the program has a different type, the system triggers a runtime error.
The basic forms of SUBMIT command is -
1. SUBMIT Rep.
2. SUBMIT (Name).
Additionals:
1. LINE-SIZE col - The list generated by the report has the line width col.
2. LINE-COUNT line - The list generated by the report has line lines per page.
3. TO SAP-SPOOL List - output to the SAP spool database
4. USING SELECTION-SCREEN scr
5. VIA SELECTION-SCREEN
6. AND RETURN - Returns to the calling transaction or program after the called program
have been executed. SUBMIT ... AND RETURN creates a new internal session.
7. EXPORTING LIST TO MEMORY
8. USER user VIA JOB job NUMBER n
9. Various additions for passing parameters to rep
10. USING SELECTION-SETS OF PROGRAM prog
What is the effect of using SUBMIT rep.... USING SELECTION-SCREEN scr?
When you execute the report, the system uses the selection screen number that you specify in the scr field. This must be a selection screen defined using the SELECT-OPTIONS, PARAMETERS and SELECTION-SCREEN statements. If you omit the addition, the system uses the standard selection screen 1000. This addition allows you to start the same report in different situations, using a different selection screen each time (what you explicitly mentioned for scr). This is the difference between USING SELECTION-SCREEN and VIA SELECTION-SCREEN. VIA SELECTION SCREEN takes its own exec report selection screen.
Q. What is the effect of using SUBMIT rep....USER user VIA JOB job NUMBER n?
Schedules the specified report in the job specified by the job name job and the job number n. The job runs under the user name user and you can omit the addition USER user. The assignment of the job number occurs via the function module JOB_OPEN This addition can only be used with the addition ...AND RETURN.
Note: When scheduling a report with the SUBMIT ... VIA JOB job NUMBER n statement, you should always use the addition ...TO SAP-SPOOL to pass print and/or archive parameters. Otherwise, default values are used to generate the list and this disturbs operations in a production environment.
What is the effect of using SUBMIT rep....VIA SELECTION SCREEN?
The addition VIA SELECTION SCREEN determines whether the report is processed in the foreground or the background.
What is the effect of using SUBMIT rep.... USING SELECTION-SETS OF PROGRAM prog?
Uses variants of the program prog when executing the program rep.
WITH SELECTION-TABLE rspar - You can dynamically transfer different values. An internal table rspar with the Dictionary structure RSPARAMS is created. This table can be filled dynamically in the calling program with all the required values for the selection screen of the called program.
Except for WITH SELECTION-TABLE, you can use any of the above options several times and in any combination within a SUBMITstatement. In particular, you can use the WITH sel addition several times for one single criterion sel. The only combination possible for the WITH SELECTION-TABLE addition is USING SELECTION-SET.
RETURN: The RETURN statement unconditionally exits a processing block that is, an event block, a dialog module or a procedure (function module, method, and subroutine).
What is 'Type Groups'? A Types statement can be stored in a 'Type Group'. A 'Type Group' (also known as Type Pool) is a Data Dictionary object that exists merely to contain one or more types or constants statement.
- Types and constants included in a program using the type-pools statement always has global Visibility.
Describe RESERVE statement?
RESERVE n LINES.
If there is not enough space left on the current page for at least n lines, this statement starts a new page. 'n' can be a constant (1,2,3,...) or a variable.
Note - Before starting a new page, the END-OF-PAGE processing is executed. This differs from NEW-PAGE.
If the RESERVE statement does not trigger a new page, output is continued on the current page. Use BACK to return to the first line output after RESERVE.
What are the differences between SY-TABIX and SY-INDEX?
SY-TABIX: It is used in internal table loops. It gets the no. of records in the internal table.
SY-INDEX: It is used in simple loops like (do......enddo).It gets the particular record number.
What is for SY-BATCH statement?
SY-BATCH is set to X in an ABAP program running in the background. Otherwise it is empty.
What is for SY-BINPT statement?
SY-BINPT is set to X during processing of batch input folders and in ABAP programs called with CALL TRANSACTION USING. Otherwise it is empty.
OPTIONS FROM in the CALL TRANSACTION USING statement can set SY-BINPT to empty for the whole program execution, as well as at the end of the BDC data.
SY-CPROG - In externally called procedures, the name of the calling program, otherwise the name of the current program.
SY-DBNAM - With executable programs this is the linked logical database.
SY-DYNGR - Screen group of current screen. You can assign several screens to a common screen group.
SY-DYNNR - Number of current screen during the selection screen processing, SY-DYNNR contains the screen number of the current selection screen.
SY-LDBPG - With executable programs, the database program of the linked logical database.
Here is a brief description of difference between SY_TABIX and SY_INDEX and using them with several conditions.
SY-TABIX
Current line of an internal table. SY-TABIX is set by the statements below, but only for index tables. The field is either not set or is set to 0 for hashed tables.
APPEND sets SY-TABIX to the index of the last line of the table, that is, it contains the overall number of entries in the table.
COLLECT sets SY-TABIX to the index of the existing or inserted line in the table. If the table has the type HASHED TABLE, SY-TABIX is set to 0.
LOOP AT sets SY-TABIX to the index of the current line at the beginning of each loop lass. At the end of the loop, SY-TABIX is reset to the value that it had before entering the loop. It is set to 0 if the table has the type HASHED TABLE.
READ TABLE sets SY-TABIX to the index of the table line read. If you use a binary search, and the system does not find a line, SY-TABIX contains the total number of lines, or one more than the total number of lines. SY-INDEX is undefined if a linear search fails to return an entry.
SEARCH <itab> FOR sets SY-TABIX to the index of the table line in which the search string is found.
SY-INDEX
In a DO or WHILE loop, SY-INDEX contains the number of loop passes including the current pass.
Explicit Enhancement provides the terms Enhancement Point and Enhancement Section.
Enhancement Point:- It is a point in the SAP program where customers can include further functions in the form of source code without modifying the existing program.
Enhancement Section:- It is the option provided explicitly by SAP to replace a block of SAP code with custom code.
Field Exit and Field Enhancement
Tcodes: CMOD, PRFB and RSMODPRF program
Field Exit can be used to add your own logic to any data element in SAP ABAP data dictionary. You can use this logic to perform checks, conversions or any business related processing on any screen field.
Think of a scenario where you need a data element to use values under a condition of larger than 100. You can use a Field Exit for this purpose in RSMODPRF program.
Now we will use Field Enhancement Technique to Change this Data Element Description to “Test Document Category”.
A Creating IDoc Extensions
To create an IDoc extension:
Create a segment as follows:
Enter transaction code WE31.
From the Segment type list, enter a segment type and then click the Create icon.
The following screenshot shows this page:

In the Short Description field, enter a description for the segment. Enter the name of the field (custom attribute) and data element to be inserted in the segment.
The following screenshot shows this page:

Click the Save icon. In the Person responsible and Processing person fields, enter the required details and then press Enter.
The following screenshot shows this page:

In the Package field, enter a name for the package and then click the Save icon.
The following screenshot shows this page:

Create the IDoc type as follows:
Run transaction code WE30.
Enter a name for the IDoc extension in the Obj name field, select the Extension option, and then click the Create icon.
The following screenshot shows this page:

Select the Create new option, enter
HRMD_A06in the Linked basic type field, and then enter a description in the Description field.The following screenshot shows this page:

Expand the tree, and then select the segment (for example, E1P0000) in which you want the extension segment to be inserted.
The following screenshot shows this page:

In the Maintain Attributes dialog box, enter values in the Segm. type, Minimum number, and Maximum number fields. In the dialog box that is displayed when you save your entries, enter a name for the segment.
The following screenshot shows this page:

The following screenshot shows this page:

Specify the output type.
Run transaction code WE82.
Click the Create new entries icon.
Enter values in the following fields:
Message type: Enter HRMD_A.
Basic Type: Enter HRMD_A06
Extension: ZHR_EXT
Release: Enter the release for which the message type assignment is valid.
Create a transport request, and then save the entries.
The following screenshot shows this page:

Link IDoc type, message type, and function module.
Run transaction code WE57.
Link the FM, IDOC type, Extension, and Message Type as shown in the following screenshot. Specify the direction as either 2 (Inbound) or 1 (Outbound), and then save the entries.

Specify the segment in which the infotype is to be inserted.
Run transaction code SM30.
Select the infotype in which the segment is to be inserted, for example, 0000.
Click the Details icon to add the segment.

In the 2nd IDOC segment field, enter the segment name and then click the Save icon.
The following screenshot shows this page:

Modify the partner profile.
Run transaction code WE20.
In the Partner no. field, enter the name of the receiver logical system (for OIMiDOC).
In the Partner type field, enter LS.
In the Outbound paramtrs table, select HRMD_A as the message type and then click the Details icon.
The following screenshot shows this page:

In the Extension field of the Outbound Options tab, enter the name of the extension (for example, ZHR_EXT) and then click the Save icon.
The following screenshot shows this page:

Implement BADI HRALE00OUTBOUND_IDOC for the enhancement.
Run transaction code WE18.
In the Definition name field, enter
BADI HRALE00OUTBOUND_IDOCand then click Display.The following screenshot shows this page:

On the Interface tab, double-click Example Implementation Clasee.
The following screenshot shows this page:

Double-click the IDOC_DATA_FOR_RECEIVER_MODIFY method.
The following screenshot shows this page:

Write the code in this method for activating the use of the extension.
Note:
An access key is required to perform this step.The following screenshot shows this page:

To reduce segments in IDOC, use txn BD53.
Assign a new Z message type and create it on the basis of std message type. You will see all segments assosciated with the IDOC for that message type.
Select the segements you want to retain and activate the IDOC type.
Since you want to use reduced IDOC based on the partner profile, assign new Z message type to the partner profile.
Also assign this message type to the reduced IDOC by changing the distribution model thru txn BD64.
the programs RBDMANIN, RBDMANI2 are used to process the error idocs. RBDAPP01 is to process the Idocs which are ready for transfer. and the last RBDMON00 is to choose the Idocs to process . some of the programs are documented just check it
Avoid using SELECT...ENDSELECT... construct and use SELECT ... INTO TABLE.
Use WHERE clause in your SELECT statement to restrict the volume of data retrieved.
Design your Query to Use as much index fields as possible from left to right in your WHERE statement
Use FOR ALL ENTRIES in your SELECT statement to retrieve the matching records at one shot.
Avoid using nested SELECT statement, SELECT within LOOPs.
Avoid using INTO CORRESPONDING FIELDS OF TABLE. Instead use INTO TABLE.
Avoid using SELECT * and Select only the required fields from the table.
Avoid nested loops when working with large internal tables.
Use assign instead of into in LOOPs for table types with large work areas
When in doubt call transaction SE30 and use the examples and check your code
Whenever using READ TABLE use BINARY SEARCH addition to speed up the search. Be sure to sort the internal table before binary search. This is a general thumb rule but typically if you are sure that the data in internal table is less than 200 entries you need not do SORT and use BINARY SEARCH since this is an overhead in performance.
Use "CHECK" instead of IF/ENDIF whenever possible.
Use "CASE" instead of IF/ENDIF whenever possible.
Use "MOVE" with individual variable/field moves instead of "MOVE-CORRESPONDING", creates more coding but is more efficient (in ECC6 MOVE-CORRESPONDING is faster in almost all the cases).
TABLE BUFFERING : This can help in improving the performance but this has to be used with caution. Buffering of tables leads to data being read from the buffer rather than from table. Buffer sync with table happens periodically. If this table is a transaction table chances are that the data is changing for a particular selection criteria. Using table buffering in such cases is not recommended. Use Table Buffering for Master Data or data which is having low transaction. Also, when using a table with buffering ensure that the general criteria which is used for buffering is also being used. If the criteria of buffering is not same as the one used in your code, it has no effect and buffering will not be useful instead it will cause a overhead on performance since evrytime it will fill the buffer. In such cases use 'BYPASSING BUFFER' to speed up the SQL's.
INDEX: Creation of Index for improving performance should not be taken without thought. Index speeds up the performance but at the same time adds two overheads namely; memory and insert/append performance. When INDEX is created, memory is used up for storing the index and index sizes can be quite big on large transaction tables! When inserting new entry in the table, all the index's are updated. More index more time. More the amount of data, bigger the indices, larger the time for updating all the indices.
PERFORM : When writing a subroutine, always provide type for all the paramters. This reduces the overhead which is present when system determines on it's own each type from the formal parameters that are passed.
Updating/Modifying internal tables: In case the amount of entries are more than 200 in an internal table and some field's are being manipulated or some column of the internal table being filled based on some logic, usage of FIELD-SYMBOLS is recommended. This removes the overhead of moving the operation via a seperate memory area (work area).
avoid repititive selects on same table as much as possible. make sure all the selects are outside of loops. try to select data at one go for a table. if selects are slow try creating table indexes to make selects faster.
n.b.... avoiding CORRESPONDING FIELDS OF doesnt help.. in fact using it is better. I have read a blog on this... sap handles things better than us so you can use it safely.
try using field symbols .. use sorted internal tables if possible... specially the ones you will search into
most performance issues can be solved by non repititive calls to function modules / table selects which can be done in one go..
ABAP PERFORMANCE ISSUES.
ABAP/4 Optimization
• Use the GET RUN TIME command to help evaluate performance. It's hard to know whether that optimization technique REALLY helps unless you test it out. Using this tool can help you know what is effective, under what kinds of conditions. The GET RUN TIME has problems under multiple CPUs, so you should use it to test small pieces of your program, rather than the whole program.
• Avoid 'SELECT *', especially in tables that have a lot of fields. Use SELECT A B C INTO instead, so that fields are only read if they are used. This can make a very big difference.
• Field-groups can be useful for multi-level sorting and displaying. However, they write their data to the system's paging space, rather than to memory (internal tables use memory). For this reason, field-groups are only appropriate for processing large lists (e.g. over 50,000 records). If you have large lists, you should work with the systems administrator to decide the maximum amount of RAM your program should use, and from that, calculate how much space your lists will use. Then you can decide whether to write the data to memory or swap space. See the Fieldgroups ABAP example.
• Use as many table keys as possible in the WHERE part of your select statements.
• Whenever possible, design the program to access a relatively constant number of records (for instance, if you only access the transactions for one month, then there probably will be a reasonable range, like 1200-1800, for the number of transactions inputted within that month). Then use a SELECT A B C INTO TABLE ITAB statement.
• Get a good idea of how many records you will be accessing. Log into your productive system, and use SE80 -> Dictionary Objects (press Edit), enter the table name you want to see, and press Display. Go To Utilities -> Table Contents to query the table contents and see the number of records. This is extremely useful in optimizing a program's memory allocation.
• Try to make the user interface such that the program gradually unfolds more information to the user, rather than giving a huge list of information all at once to the user.
• Declare your internal tables using OCCURS NUM_RECS, where NUM_RECS is the number of records you expect to be accessing. If the number of records exceeds NUM_RECS, the data will be kept in swap space (not memory).
• Use SELECT A B C INTO TABLE ITAB whenever possible. This will read all of the records into the itab in one operation, rather than repeated operations that result from a SELECT A B C INTO ITAB... ENDSELECT statement. Make sure that ITAB is declared with OCCURS NUM_RECS, where NUM_RECS is the number of records you expect to access.
• Many tables contain totals fields (such as monthly expense totals). Use these avoid wasting resources by calculating a total that has already been calculated and stored.
• Program Analysis Utility
To determine the usage of variables and subroutines within a program, you can use the ABAP utility called ‘Program Analysis’ included in transaction SE38. To do so, execute transaction SE38, enter your program name, then use the path Utilities -> Program Analysis
ABAP PERFORMANCE IMPROVEMENTS VIA DATA DICTIONARY
• INDEX CREATION SUGGESTIONS RELATED TO DATABASE PERFORMANCE
• The columns at the beginning of an index are the most “common”. The most “common” columns are those where reports are selecting columns with no ranges - the where clause for these columns is an “equal to” expression. Rearrange columns of an index to match the selection criteria. For example, if a select statement is written to include columns 1 and 2 with “equal to” expressions in the where clause and column 3 and 4 are selected with value ranges, then the index should be created with columns in the sequence of 1,2,3,4.
• Columns towards the end of the index are either infrequently used in selects or are part of reporting selects that involve ranges of values.
• TABLE TYPE SUGGESTIONS RELATED TO DATABASE PERFORMANCE
• Use VIEW tables to effectively join and “denormalize” related tables that are taking large amounts of time to select for reporting. For example, at times where highly accessed tables normalize description text into one table and the header data into another table, it may make sense to create a view table that joins the relevant fields of the two associated with a poor performing ABAP.
• For POOL tables that contain large amounts of data and are highly accessed, convert the pooled table into a transparent table and add an index. POOLED tables are supposed to be collections of smaller tables that are quickly accessed from the database or are completely buffered in memory. Pooled tables containing more than a few hundred rows and are accessed many times in a report or transaction are candidates for POOL to TRANSPARENT Conversion. For example, table A053 contains tax jurisdiction condition information and are accessed more than ten times in the sales order create transaction. If the entire United States tax codes are loaded into these condition tables, the time to save a sales order increases to unacceptable levels. Converting the tax condition table to transparent and creating an index based upon the key fields, decreases processing time from minutes to seconds.
• Do not allow the use of LIKE in an SAP SQL statement accessing a large table.
• Use internal tables in ABAPs to preselect values once and store values in memory for sorting and searching purposes (this is an assumption stated at the beginning of this discussion).
• Avoid logical databases when not processing all row s of a table. In fact, a logical database is merely a group of nested SAP SQL SELECT statements. In general, when processing a small number of rows in a larger table is required, the use of internal tables and NOT using a logical database or nested selects will be much better for performance.
DATA: Class1 TYPE REF TO Class1.
CREATE Object: Class1. Static Attributes are not instance specific and exist only once for all instance of the class i.e they exist once per class. Static attributes are defined using statement CLASS-DATA. Static attributes are accessed directly with the help of class name like class_name⇒name_1 = 'Some Text'.
The attributes and methods declared in Public section in a class can be accessed by that class and any other class, sub-class of the program.
When the attributes and methods are declared in Protected section in a class, those can be accessed by that class and sub classes (derived classes) only.
When the attributes and methods are declared in Private section in a class, those can be accessed by only that class and not by any other class.
CONSTANTS value cannot be changed. Use CONSTANTS to store data that should not be changed both from inside the class as well as from outside the class.
Defining attributes with READ-ONLY addition – An attribute can have READ-ONLY addition only if it defined in the PUBLIC SECTION of the class. Define an attribute with READ-ONLY if you want to the attribute to be accessed from outside the class but cannot be modified from outside the class. An attribute with READ-ONLY addition can only be modified by a method of the class.
Instance Methods
Instance methods are declared using the METHODS statement. They can access all the attributes of a class and can trigger all its events.if u declare one method as a instance then we can call that method using object name, that method is dependent of that object.You declare them using the DATA statement.
Instance components exist separately in each instance (object) of the class and are referred using instance component selector using '->'
Static Methods
Static methods are declared using the CLASS-METHODS statement. This statement can access static attributes of a class and is can trigger static events only. if u declare one method as a static then we can call that method using class name, that method is independent of that object.You declare them using the CLASS-DATA statement.
Static components only exist once per class and are valid for all instances of the class. They are declared with the CLASS- keywords
Static components can be used without even creating an instance of the class and are referred to using static component selector ‘ =>’ .
Constructors
As well as the normal methods that are called explicitly, there are two special methods called constructor and class_constructor, which are called automatically when an object is created or when a class component is accessed for the first time.
PARAMETERS:
We need parameters for Modularization and reuse of the code.
The formal parameters are the parameters that you define in the subroutine declaration.
FORM f_test_subroutine TABLES t_itab STRUCTURE e_itab
USING us_par1
CHANIGN ch_par2.
the actual parameters are the actual values passed to the subroutine while calling the subroutine..
PERFORM f_test_subroutine TABLES t_mytab
USING w_par1
CHANGING w_par2..
Reference Variable
Reference variables contain references. The actual contents of a reference variable, namely the value of a reference, is not visible in an ABAP program. ABAP contains data references and object references . Consequently, there are two kinds of data reference variables - data reference variables and object reference variables.
You create the data type of a data reference variable using:
TYPES t_dref TYPE REF TO DATA.
You can create a data reference variable either by referring to the above data type or using:
DATA dref TYPE REF TO DATA.
Reference variables are handled in ABAP like other data objects with an elementary data type. This means that a reference variable can be defined as a component of a complex data object such as a structure or internal table as well as a single field.
Inheritance in SAP ABAP
Inheritance means to derive code functionality from one class to another
It means defining a class in terms of another (parent) class
This feature of object orientation promotes reusability of classes
We can use inheritance while writing a class with which to derive a parent class, by mentioning the name of parent class in the definition of derived class
Hence, the class that is inherited is called parent or base class or super class, and the class inheriting the base class is the child class or derived class or subclass
Through inheritance, an object from derived class can obtain characteristics of objects from base class
The keyword to use for inheritance is ‘INHERITING FROM’, just beside the class definition
SYNTAX FOR DEFINING CLASS:
CLASS <subclass_name> DEFINITION INHERITING FROM <superclass_name>
EXAMPLE
CLASS Z_Dog DEFINITION INHERITING FROM Z_Animal
ABAP PROGRAM EXAMPLE
Report ZDATAFLAIR_INHERITANCE.
CLASS DataflairParent Definition.
PUBLIC Section.
Data: df_public(25) Value 'This is from parent class’.
Methods: DataflairParentM.
ENDCLASS.
CLASS DataflairChild Definition Inheriting From DataflairParent.
PUBLIC Section.
Methods: DataflairChildM.
ENDCLASS.
CLASS DataflairParent Implementation.
Method DataflairParentM.
Write /: df_public.
EndMethod. ENDCLASS.
CLASS DataflairChild Implementation.
Method DataflairChildM.
Skip.
Write /: 'This is from child class', df_public.
EndMethod.
ENDCLASS.
Start-of-selection.
Data: DataflairParent Type Ref To DataflairParent,
DataflairChild Type Ref To DataflairChild.
Create Object: DataflairParent, DataflairChild.
Call Method: DataflairParent→DataflairParentM,
child→DataflairChildM.
OUTPUT:
This is from parent class
This is from child class
This is from parent class
they inherit some characteristics from their parents but also have many of their own characteristics.
One point to note is that in ABAP a sub-class cannot inherit from multiple parents. For this purpose we have INTERFACES to extend the generalization concept.
Redefining Methods in Sub Class in SAP ABAP
We can redefine methods of superclass in subclass
We usually do this so that we can have subclass-specific methods
However, we must keep the section of redefinition of the method the same as the parent method
We only need to use the name of the inherited method and can access its components using ‘super’ reference
In ABAP inheritance from super-class is implemented using the INHERITING FROM Keyword.
Inheritance is fine but sometimes you don’t want the parent class behavior to be inherited totally by the child class. In other word’s the parent class CL_VEHICLE has a method called ESTIMATE_FUEL in the vehicle class, but the sub-class(CL_CAR) estimates fuel in a different way than let’s say a CL_BUS, then we don’t want to carry the ESTIMATE_FUEL from the parent CL_VEHICLE implementation to the child. In such cases we would have to redefine the method. In object orientation this is called method Overriding. In ABAP you redefine child methods with the REDEFINE keyword.
With redefinition there is also a concept called as Overloading. Method Overloading happens when you define the same method but with different signatures and thus different implementation. This is not supported in ABAP Objects
Sometimes you do not want any of the child classes to redefine a particular method of the parent class. In that case you need define the method with the FINAL keyword. Even classes can be FINAL.
In some cases you don’t want multiple instances of the same class in the program execution. Typical case is when you are dealing with an employee self-service application. (ESS). When the employee logs in to access their data, you don’t want another object instance of the employee other than the one who has logged in at that time. Remember the SY-UNAME is the employee we want to store at runtime as there can be only one SY-UNAME at one time. This is achieved with the use of the Keyword CREATE PRIVATE in addition to FINAL and instantiating it using its static constructor. Such classes are called Singleton classes.
Encapsulation in ABAP
Encapsulation in object orientation means wrapping data and functions together
This hides the data and function from the outside world, thus promoting data hiding
Data hiding means obstructing the view of private data and functions from unwanted third parties, and data abstraction means showing users only what they need to see
In ABAP, we can do encapsulation via access methods – public, private, protected.
We can also perform encapsulation via interfaces (which are similar to classes, the only difference is that we do not implement anything in an interface, it has to be done via class inheriting the interface, as shown in example below)
EXAMPLE OF ABAP ENCAPSULATION VIA INTERFACE
Report ZDATAFLAIR_ENCAPSULATION.
Interface df_interface.
Data text1 Type char35.
Methods Dataflairmethod1.
EndInterface.
CLASS DataflairClass1 Definition.
PUBLIC Section.
Interfaces df_interface.
ENDCLASS.
CLASS DataflairClass2 Definition.
PUBLIC Section.
Interfaces df_interface.
ENDCLASS.
CLASS DataflairClass1 Implementation.
Method df_interface~Dataflairmethod1.
df_interface~text1 = 'DataflairClass 1 Interface method'.
Write / df_interface~text1.
EndMethod.
ENDCLASS.
CLASS DataflairClass2 Implementation.
Method df_interface~Dataflairmethod1.
df_interface~text1 = 'DataflairClass 2 Interface method'.
Write / df_interface~text1.
EndMethod.
ENDCLASS.
Start-Of-Selection.
Data: DataflairObject1 Type Ref To DataflairClass1,
DataflairObject2 Type Ref To DataflairClass2.
Create Object: DataflairObject1, DataflairObject2.
CALL Method: DataflairObject1→df_interface~Dataflairmethod1,
DataflairObject2→df_interface~Dataflairmethod1.
OUTPUT:
DataflairClass 1 Interface method
DataflairClass 2 Interface method
Polymorphism in SAP ABAP
It means using one thing for different operations
It occurs usually in inheritance – for e.g. redefining methods which we saw under the concept of inheritance
Polymorphism means redefining methods to either overload them or override them
Overloading methods means when we use the same method name but use different parameters
Overriding methods means when we use the same method name and parameters, but the two methods are related via inheritance relationship
ABAP Polymorphism Example(Redefining methods)
Report ZDATAFLAIR_POLYMORPHISM.
CLASS df_class_02 Definition Abstract.
PUBLIC Section.
Methods: prgm_type Abstract,
dfapproach1 Abstract.
ENDCLASS.
CLASS df_class_02 Definition
Inheriting From df_class_01.
PUBLIC Section.
Methods: prgm_type Redefinition,
approach1 Redefinition.
ENDCLASS.
CLASS class_procedural Implementation.
Method prgm_type.
Write: 'An apple'.
EndMethod. Method approach1.
Write: 'a fruit'.
EndMethod. ENDCLASS.
CLASS class_OO Definition
Inheriting From class_prgm.
PUBLIC Section.
Methods: prgm_type Redefinition,
approach1 Redefinition.
ENDCLASS.
CLASS class_OO Implementation.
Method prgm_type.
Write: 'An onion'.
EndMethod.
Method dfapproach1 .
Write: 'a vegetable'.
EndMethod.
ENDCLASS.
CLASS class_type_approach Definition.
PUBLIC Section.
CLASS-METHODS:
start Importing df_class_01_prgm
Type Ref To class_prgm.
ENDCLASS.
CLASS class_type_approach IMPLEMENTATION.
Method start.
CALL Method df_class_01→prgm_type.
Write: is.
CALL Method df_class_01→approach1.
EndMethod.
ENDCLASS.
Start-Of-Selection.
Data: df_class_01 Type Ref To class_procedural,
df_class_02 Type Ref To class_OO.
Create Object df_class_01.
Create Object df_class_02.
CALL Method class_type_approach⇒start
Exporting
class1_prgm = df_class_01.
New-Line.
CALL Method class_type_approach⇒start
Exporting
class1_prgm = df_class_02.
OUTPUT:
An apple is a fruit
An onion is a vegetable
Polymorphism happens when the same method has different forms.
In Object Orientation pure polymorphism supports both overloading as well as method overriding.
We already learnt ABAP supports overloading(you don’t want the parent class behavior to be inherited totally by the child class) but not overriding(define the same method but with different signatures and thus different implementation)
two of the major and powerful constructs in Object Orientation in ABAP, which are derivatives of overloading and called UP-CASTING and its opposing DOWN-CASTING.
UP-CAST (Widening Cast)
Because of Inheritance, variables of super-class can also refer to sub-class instances at runtime.
Let’s say we have a method called ESTIMATE_FUEL in LCL_VEHICLE class as such
ESTIMATE_FUEL = DISTANCE * BASE_FACTOR
Consider that BASE_FACTOR is a constant value of 5.
Therefore ESTIMATE_FUEL will be 500 if the distance is 100 miles.
Since LCL_CAR is a sub-class of LCL_VEHICLE hence ESTIMATE_FUEL will also be present in LCL_CAR and the estimated fuel value for the car will also be 500. However since CAR is a specialized form of vehicle hence let say we redefine it’s estimated_fuel calculation to incorporate another constant CAR_FACTOR = 5. So estimate_fuel for a car becomes
ESTIMATE_FUEL = DISTANCE * BASE_FACTOR * CAR_FACTOR.
Thus Estimated_fuel for car will be 2500 for the same distance.
In this case we will have to redefined the estimate_fuel method of the parent into the child.
Similarly the LCL_BUS class is a sub-class of LCL_VEHICLE hence its estiamte_fuel will also be 500. We will redefine this method in the LCL_BUS class also to take into consideration the BUS_FACTOR which has a constant value of 10.
So the estimated fuel for a bus will be calculated as follows
ESTIMATE_FUEL = DISTANCE * BASE_FACTOR * BUS_FACTOR.
Thus estiamted_fuel for bus will be 5000 for the same distance of 100 miles.
OK, so now I have explained you the scenario.
Now imagine the rental company is planning to rent out X Cars and Y buses for an upcoming event. The event is happening out of town atleast 100 miles away.
The program therefore at runtime instantiates the appropriate vehicles and stores their references into an internal table. But since we want to store reference of all the vehicles into the same internal table. Hence we will define the table column as type LCL_VEHICLE.
Now to calculate the estimate_fuel for all the vechiles we simply need to loop through the internal table and call the Estimate_fuel for each vechile as such.
TOTAL_FUEL_CONSUMPTION = TOTAL_FUEL_CONSUMPTION + ESTIMATED_FUEL.
This way we need not bother with what is exactly stored in the internal table, whether it is car or bus the system will take care of calling the appropriate estimate_fuel method implementation based on the object.
This is called UP-CASTING because you are pointing a child reference to a parent reference.
R_VEHICLE = R_CAR.
and because the target variable r_vehicle can refer to a wide range of object.
It should be evident now that with down-casting you are moving a reference of a parent class to a child class.
Incase upcasting we had R_VEHICLE = R_CAR.
In downcasting we would do R_CAR1 ?= R_VEHICLE.
Which means you are reassigning the reference of r_car back to r_car1.
The syntax for down casting in ABAP is
MOVE .. ?TO or its short form ?=
When would you use such a down-casting.
This could be used in the case when you have a generic reference and now you want to use the specific method from the generic reference. In that case you would first down-cast the generic reference to a specific reference type which has the method and then call the method through it.
However remember you cannot convert an R_CAR variable to a R_BUS variable using down-cast
so the folowing will throw an exception of type cx_sy_move_cast_error.
R_VEHICLE = R_CAR
R_TRUCK ?= R_VEHICLE.
Because now you are moving a truck reference to a car through vehicle.
1. Narrowing Cast( Upcasting):- When we assign the instance of the Sub class back to the instance of the Super class, than it is called the “Narrow Casting”, because we are switching from a “More Specific view of an object” to “less specific view“.
2. Widening Cast(Downcasting):- When we assign the instance of the Super class to the Subclass, than it is called the Widening Cast, because we are moving to the “More Specific View” from the “Less specific view”.
“——— Narrow cast(Upcast)—————“
data : o_shp type REF TO lcl_shape.
o_shp = o_cir. ” Narrow cast(Upcast)
call METHOD o_shp->draw( ). ” calls sub class Draw() method
“call METHOD o_shp->calc_area( ) . ” compilation error
uline.
“———- Widening Cast(Downcast) ———–“
data : o_cir1 type REF TO lcl_circle.
” o_cir1 = o_shp. ” complilation error
o_cir1 ?= o_shp. ” Widening Cast(Downcast)
call METHOD o_cir1->draw( ). ” calls subclass Draw() method
call METHOD o_cir1->calc_area( ).
Abstract Class in SAP ABAP
Abstract class in SAP ABAP is a special type of class, which can not be instantiated, which means we can not create objects of that class. it needs to be subclassed by another class to use its properties. An abstract class can include one or more abstract methods, which are method declarations without an implementation. When a class inherits from an abstract class, it is required to provide implementations for all the abstract methods declared in the abstract class.
CLASS abstract_class DEFINITION ABSTRACT.
PUBLIC SECTION.
METHODS: abstract_method ABSTRACT.
ENDCLASS.
CLASS abstract_class IMPLEMENTATION.
METHOD abstract_method.
* Implementation of the abstract method goes here
ENDMETHOD.
ENDCLASS.
Abstraction helps us use Generalizations in our software code as well. A pure object oriented language should support Abstraction.
So, in the case of the rental company we could have an abstract class called as CL_VEHICLE. In ABAP you define an abstract classes with the ABSTRACT keyword.
Note:
- Both, classes and methods can be ABSTRACT.
- Static methods cannot be ABSTRACT
Now since we want to make CL_VEHICLE Abstract, we would need to call it an Abstract class such that no instantiation of the class is possible. An instance of a class is called an Object, and we use the CREATE OBJECT keyword to instantiate an object. But since there is nothing known as vehicle hence there can be no runtime object of vehicle. In ABAP, we use the ABSTRACT keyword to define an abstract class.
Interface in SAP ABAP
The interface in SAP ABAP is different from the class, it can not have any implementation like the class. It defines a set of method declarations that a class must implement without providing any implementation detail of that method. Interface helps in achieving multiple inheritance. Multiple inheritance can be defined as a class can inherit multiple interfaces. Due to Inheritance interface provides a base for polymorphism because the method declared in the interface behaves differently in different classes. Like class Interface can be defined locally or globally in the ABAP programming language.
CLASS Your_Class DEFINITION.
PUBLIC SECTION.
INTERFACES: Your_Interface.
ENDCLASS.
CLASS Your_Class IMPLEMENTATION.
METHOD Your_Interface~method1.
" Implementation for method1
ENDMETHOD.
METHOD Your_Interface~method2.
" Implementation for method2
ENDMETHOD.
" ... Implement other methods from the interface
ENDCLASS.
Method declaration | If we declare a new method in SAP ABAP interface, then it is mandatory for all the implementing class to implement that method. | In SAP ABAP abstract class if you declare a non abstract method then it is not mandatory to inherit that method for all class. |
|---|---|---|
Method Implementation | In SAP ABAP Interface, we can only declare class we can’t write instructions inside that method. | In SAP ABAP abstract method, we can have default method and , |
Access Modifier | By default, all the elements are PUBLIC in interface. | In SAP ABAP abstract class, we can set the access modifier to each element according to need. |
Multiple inheritance | By using Interface in SAP ABAP, we can achieve multiple inheritance. | While, Abstract classic in SAP ABAP does not support multiple inheritance, as Only one abstract class may be used as the Super class because ABAP does not support multiple Super classes. |
Go to the properties tab of class builder (SE24) and change the instantiation type to private. Then you can create a private constructor. The advantage of having a private constructor is that now no one can create an object of your class..
So how do we create the instance of this class ? We create a static method GET_INSTANCE that will be used to create the instance. A static method because this method can be called directly with the class reference (without an object). Inside this method, we can create the object (because the constructor is a private method, we can call it within class).
Now, how to make sure that only one instance is created? Simple.
Store the own reference as an attribute of the class. In the method GET_INSTANCE check if this attribute is populated. If it populated then return the same instance. If not, create a new one, store it in the own attribute and return the instance.
IF gref_obj IS INITIAL.CREATE OBJECT gref_obj TYPE (class name).
ENDIF.

RETURN gref_obj.we can create a class with a method that creates a new instance of the class if one does not exist.
If an instance of the class already exists, the method just simply returns that object. To make sure that no one can create a new instance of the class by using the CREATE OBJECT statement, we can use CREATE PRIVATE addition in the class definition.
REPORT  zdp_singleton.
*----------------------------------------------------------------------*
*       CLASS lcl_singleton DEFINITION
*----------------------------------------------------------------------*
*  Singleton class
*----------------------------------------------------------------------*
CLASS lcl_singleton DEFINITION CREATE PRIVATE.
  PUBLIC SECTION.
    CLASS-METHODS:
        factory RETURNING value(re_intance) TYPE REF TO lcl_singleton.
    METHODS:
        get_attr RETURNING value(re_attr) TYPE i,
        set_attr IMPORTING im_attr TYPE i.
  PRIVATE SECTION.
    CLASS-DATA:
        mo_instance TYPE REF TO lcl_singleton.
    DATA:
        mv_attr TYPE i.

ENDCLASS.                    "lcl_singleton DEFINITION

*----------------------------------------------------------------------*
*       CLASS lcl_singleton IMPLEMENTATION
*----------------------------------------------------------------------*
* Singleton class
*----------------------------------------------------------------------*
CLASS lcl_singleton IMPLEMENTATION.
  METHOD factory.
    IF mo_instance IS INITIAL.
      CREATE OBJECT mo_instance.
    ENDIF.
    re_intance = mo_instance.
  ENDMETHOD.                    "constructor
  METHOD get_attr.
    re_attr = mv_attr.
  ENDMETHOD.                    "get_attr
  METHOD set_attr.
    mv_attr = im_attr.
  ENDMETHOD.                    "set_attr
ENDCLASS.                    "lcl_singleton IMPLEMENTATION

DATA: go_obj1 TYPE REF TO lcl_singleton,
      go_obj2 LIKE go_obj1,
      gv_attr TYPE i.

START-OF-SELECTION.
  " Get an instance of lcl_singleton
  go_obj1 = lcl_singleton=>factory( ).
  go_obj1->set_attr( 10 ).

  " try to get another instance
  go_obj2 = lcl_singleton=>factory( ).
  " Check the attribute of the new instance
  " it should be the same as go_obj1.
  gv_attr =  go_obj2->get_attr( ).

WRITE: gv_attr.DATA : lr_table TYPE REF TO cl_salv_table.
cl_salv_table=>factory( IMPORTING r_salv_table = lr_table
CHANGING t_table = lcl_main=>it_mara ) .
lr_table->display( ).
ENDMETHOD.
OData:
SAP Gateway Tracing and Error Checking
There may come a point you’ll need visibility to the Gateway Server as you progress with your Bot development. For example, while you could be getting one response through Postman, your bot could receive a different response which may require further analysis. There are two helpful transaction codes to help you investigate why that might be the case: /n/iwfnd/traces and /n/iwfnd/error_log.
Gateway Tracing Tool
/n/iwfnd/traces is a utility that allows you to detect and debug issues on the front end. By enabling the traces, you can see your calls as they hit the Gateway. You should also be mindful that the enabled traces are normally in place for a few hours. Further, the traces are only for your account by default.

In the Performance Trace (V2 Only) tab, all your requests will be listed from all sources such as Postman, iRPA, and even from web browsers. As shown below, clicking on the refresh button on the top left to update the main windowpane with each new request.

What might be more useful from the an iRPA development perspective is the Payload Trace tab. As with the Performance Trace, the list of requests will update after clicking on the refresh button.

You can double click on any request on the list to see the payload sent with the request and the response that was returned. Depending on how the Desktop Studio Debugger is configured, this information may not be persisted or easily retrievable. The Payload Trace will have this information.
If we double click on the failed PATCH request and click on the Response line, we see that the request in this instance wasn’t processed because the CSRF token validation failed.

Gateway Error Log
/n/iwfnd/error_log can be positioned as either an alternative or adjacent tool to the Payload Trace. The Gateway Error Log will display the error logs for all users.
For our example, we sent a PATCH request with an empty payload and that resulted as an entry in the error log that produced a 400 status code.

We can divide OData URI into 2 parts:
Do Not Need Custom Implementation (This Blog)
- $select
- $count
- $expand
- $format
- $links
- $value
- Need Custom Implementation (Implementing All OData Query/URI Options – Part 2)
- $orderby
- $top
- $skip
- $filter
- $inlinecount
- $skiptoken
Implementation
Let’s start with the URI commands which do not need any custom implementations:
1. $select
the $select query option in OData is used to specify which properties or fields of a resource should be included in the response. The $select option is typically used to optimize performance by limiting the number of columns that are returned in a query. The value of the $select option is a comma-separated list of the properties or fields that should be included in the response.
For example, if you want to retrieve only the name and address fields of a customer resource, you would use a query like /Customers?$select=Name, Address.
This is an example string that is likely being used to select specific fields, “Name” and “Address,” from a collection of “Customers” in a database.
/sap/opu/odata/sap/ZNS_PORELATED_SRV/EKKOSet?$select=Ebeln, Bukrs, ErnamThe above query will give selected fields i.e Ebeln, Burks and Ernam from the DB:

1. $select.jpg
We can get a similar result for a particular record as well.
/sap/opu/odata/sap/ZNS_PORELATED_SRV/EKKOSet('4500000000')?$select=Ebeln, Bukrs, ErnamThe above query will give the below result:

1.1. $select.jpg
2. $count
The $count query option in OData is used to retrieve the number of entities in a collection. The $count option is typically used to optimize performance by limiting the amount of data that is returned in a query.
When the $count option is included in a query, the response will include the total number of entities in the collection, rather than the actual entities themselves.
For example, if you want to retrieve the number of customers in a customer resource, you would use a query like /Customers/$count.
The response will return a single number, for example 28.
It’s important to note that the $count option can only be used on collections and not on individual entities.
We can also combine the $count with other options like $top, $skip, $filter, $expand etc.
/sap/opu/odata/sap/ZNS_PORELATED_SRV/EKKOSet('6000000000')/ToPOItem/$countThe above query will count the total number of records for the mentioned PO number.

2. $count.jpg
3. $expand
The $expand query option in OData is used to retrieve related entities along with the requested entity. The $expand option is used to retrieve related data in a single request instead of making multiple requests to the server.
For example, if you have an entity called “Orders” and it has a navigation property called “OrderItems” which represents the items that are part of the order, you can use the $expand option to retrieve both the Order and the OrderItems in a single request.
The query would look like /Orders?$expand=OrderItems
This query would return the Order entity along with the related OrderItems entities in the same response. You can also specify multiple navigation properties by separating them with a comma.
It is important to note that, when using $expand query option, it increases the size of the response and can affect the performance of the query. Therefore, it’s good practice to use it judiciously and only when it’s needed.
We can also use it in combination with other query options like $select, $filter, $top, $skip etc.
/sap/opu/odata/sap/ZNS_PORELATED_SRV/EKPOSet(Ebeln='6000000000',Ebelp='00010')?$expand=ToMara,ToMatDesc&$format=jsonThe above query will give the below result:

3. $expand.jpg
4. $format
The $format query option in OData is used to specify the format of the response. The $format option can be used to request the response in different formats such as JSON, XML
/Orders?$format=json
/Orders?$format=xml
/sap/opu/odata/sap/ZNS_PORELATED_SRV/EKKOSet?$format=jsonThe above query will give the result in JSON format.

4. $format.jpg
5. $links
The $links query option in OData is used to return the links between entities. The $links option is used to retrieve navigation links between related entities in a single request.
When the $links option is included in a query, the response will include URLs for the navigation properties of the entity, which can be used to retrieve the related entities. For example, if you have an entity called “Orders” and it has a navigation property called “OrderItems” which represents the items that are part of the order, you can use the $links option to retrieve the URLs for the OrderItems entities.
The query would look like /Orders?$links=OrderItems.
This query would return the URLs for the related OrderItems entities in the same response. You can also specify multiple navigation properties by separating them with a comma.
It is important to note that, when using $links query option, it increases the size of the response and can affect the performance of the query. Therefore, it’s good practice to use it judiciously and only when it’s needed.
We can also use it in combination with other query options like $select, $filter, $expand, $format etc.
/sap/opu/odata/sap/ZNS_PORELATED_SRV/EKKOSet('6000000000')/$links/ToPOItemThe above query will give the below result:

5. $links.jpg
6. $value
The $value query option in OData is used to return only the value of a primitive property or a complex property without the property name and metadata. The $value option is used to retrieve the value of a property in a single request instead of returning the entire entity or complex object.
For example, if you have an entity called “Products” and it has a primitive property called “Price”, you can use the $value option to retrieve the value of the Price property in a single request.
The query would look like /Products(‘001’)/Price/$value.
This query would return the value of the Price property in the response.
It is important to note that, the $value option can only be used on primitive properties and complex properties and not on collection properties.
This can be used in combination with other query options like $select, $filter, $expand, $format etc.
/sap/opu/odata/sap/ZNS_PORELATED_SRV/EKKOSet('6000000000')/Bukrs/$valueThe above query will show the value of Burks for the mentioned records.

6. $value.jpg
Implementation
1. $orderby: The $orderby option is used to specify a sort order for the results of a query. It is used in the URL of an OData service to indicate how the results should be sorted.
The syntax for the $orderby option is as follows: $orderby=propertyName [asc|desc], where propertyName is the name of the property by which the results should be sorted, and “asc” or “desc” is used to specify the sort order (ascending or descending, respectively).
For example, if we want to retrieve a list of customers and sort them by last name in descending order, the URL would look like this:
http://<host>/sap/opu/odata/sap/<service>/Customers?$orderby=LastName descIt is also possible to sort by multiple properties using the $orderby option, by separating each property with a comma.
http://<host>/sap/opu/odata/sap/<service>/Customers?$orderby=LastName desc, FirstName asc
The code the $orderby can be written as:
  METHOD ekkoset_get_entityset.

*- To get data from DB
    SELECT * FROM ekko INTO TABLE @DATA(lt_ekko) UP TO 10 ROWS.

*- Check the $orderby in the Odata Query
    READ TABLE it_order INTO DATA(ls_order) INDEX 1.
    IF sy-subrc IS INITIAL.
      IF ls_order-order = 'desc'.
        SORT lt_ekko BY (ls_order-property) DESCENDING.
      ELSE.
        SORT lt_ekko BY (ls_order-property) ASCENDING.
      ENDIF.
    ENDIF.

*- Check the size of the table for $inlinecount
    IF io_tech_request_context->has_inlinecount( ) = abap_true.
      DESCRIBE TABLE lt_ekko LINES DATA(lv_size).
      es_response_context-inlinecount = lv_size.
    ENDIF.

    MOVE-CORRESPONDING lt_ekko TO et_entityset.

  ENDMETHOD.
Below is the output:

1. $orderby.jpg
Another better way to use the $orderby can be the standard way of using it, displayed below:
*- Check the $orderby in the Odata Query
    /iwbep/cl_mgw_data_util=>orderby(
      EXPORTING
        it_order =  it_order                " the sorting order
      CHANGING
        ct_data  = lt_ekko
    ).
2. $top: The $top option is used to specify the maximum number of results that should be returned in a query. It is used in the URL of an OData service to indicate how many results should be returned. The syntax for the $top option is as follows: $top=n, where n is an integer indicating the number of results that should be returned.
For example, if we want to retrieve the top 10 customers, the URL would look like this:
http://<host>/sap/opu/odata/sap/<service>/Customers?$top=10The $top option can be used in combination with other options such as $filter, $select and $orderby to further refine the results of a query.
http://<host>/sap/opu/odata/sap/<service>/Customers?$filter=Country eq 'US'&$top=5&$orderby=LastName descIt’s important to note that the $top option is used to limit the number of records returned in one response and not to restrict the total number of records returned by the OData service.
  METHOD ekkoset_get_entityset.

*- To get data from DB
    SELECT * FROM ekko INTO TABLE @DATA(lt_ekko) UP TO 10 ROWS.

*- Check the $orderby in the Odata Query
    /iwbep/cl_mgw_data_util=>orderby(
      EXPORTING
        it_order =  it_order                " the sorting order
      CHANGING
        ct_data  = lt_ekko
    ).

*- For paging i.e. $top and $skip
    /iwbep/cl_mgw_data_util=>paging(
      EXPORTING
        is_paging = is_paging                " paging structure
      CHANGING
        ct_data   = lt_ekko
    ).

*- Check the size of the table for $inlinecount
    IF io_tech_request_context->has_inlinecount( ) = abap_true.
      DESCRIBE TABLE lt_ekko LINES DATA(lv_size).
      es_response_context-inlinecount = lv_size.
    ENDIF.

    MOVE-CORRESPONDING lt_ekko TO et_entityset.

  ENDMETHOD.
We can use it as below:

2. $top.jpg
3. $skip: The $skip option is used to specify the number of results that should be skipped before returning the results in a query. It is used in the URL of an OData service to indicate how many results should be skipped. The syntax for the $skip option is as follows: $skip=n, where n is an integer indicating the number of results that should be skipped.
For example, if we want to retrieve all customers but skip the first 10, the URL would look like this:
http://<host>/sap/opu/odata/sap/<service>/Customers?$skip=10The $skip option can be used in combination with other options such as $top, $filter, $select, and $orderby to further refine the results of a query.
http://<host>/sap/opu/odata/sap/<service>/Customers?$filter=Country eq 'US'&$skip=5&$top=5&$orderby=LastName descIt’s important to note that the $skip option is used to skip the records from the beginning of the result set, so it is typically used in combination with the $top option to retrieve a specific page of results.
Same code of paging(used in 3. $top). The below snippet is showing the second 2nd record as it is fetching the 1st record after skipping 1st one.

3. $skip.jpg
4. $filter: The $filter option is used to specify filter criteria for the results of a query. It is used in the URL of an OData service to indicate which results should be returned based on certain conditions. The syntax for the $filter option is as follows: $filter=condition, where the condition is a logical expression that evaluates to true or false.
The condition can be built using comparison and logical operators (eq, ne, gt, ge, lt, le, and, or, not).
For example, if we want to retrieve all customers whose last name starts with “S”, the URL would look like this:
http://<host>/sap/opu/odata/sap/<service>/Customers?$filter=startswith(LastName,'S')If we want to retrieve all customers whose last name starts with “S” and whose first name is “John”, the URL would look like this:
http://<host>/sap/opu/odata/sap/<service>/Customers?$filter=startswith(LastName,'S') and FirstName eq 'John'The $filter option can be used in combination with other options such as $top, $skip, $select, and $orderby to further refine the results of a query.
  METHOD ekkoset_get_entityset.

*- To get data from DB
*- it_filter_select_options will have filter values for $filter keyword
    IF it_filter_select_options IS INITIAL.
      SELECT * FROM ekko INTO TABLE @DATA(lt_ekko) UP TO 10 ROWS.
    ELSE.
      READ TABLE it_filter_select_options INTO DATA(ls_sopt)
                                           WITH KEY property = 'Ebeln'.
      IF sy-subrc IS INITIAL.
        SELECT * FROM ekko INTO TABLE @lt_ekko WHERE ebeln IN @ls_sopt-select_options.
      ENDIF.
    ENDIF.

*- Check the $orderby in the Odata Query
  /iwbep/cl_mgw_data_util=>orderby(
    EXPORTING
      it_order =  it_order                " the sorting order
    CHANGING
      ct_data  = lt_ekko
  ).

*- For paging i.e. $top and $skip
  /iwbep/cl_mgw_data_util=>paging(
    EXPORTING
      is_paging = is_paging                " paging structure
    CHANGING
      ct_data   = lt_ekko
  ).

*- Check the size of the table for $inlinecount
  IF io_tech_request_context->has_inlinecount( ) = abap_true.
    DESCRIBE TABLE lt_ekko LINES DATA(lv_size).
    es_response_context-inlinecount = lv_size.
  ENDIF.

  MOVE-CORRESPONDING lt_ekko TO et_entityset.

ENDMETHOD.
We can test the above code as:

4. $filter.jpg
5. $inlinecount: It is used to include the total count of all the matching results in the response. It is used in the URL of an OData service to indicate that the total count of the matching results should be included in the response. The syntax for the $inlinecount option is as follows: $inlinecount=allpages, where “allpages” is a keyword indicating that the total count should be included.
For example, if we want to retrieve all customers and include the total count of customers in the response, the URL would look like this:
http://<host>/sap/opu/odata/sap/<service>/Customers?$inlinecount=allpagesThe $inlinecount option can be used in combination with other options such as $filter, $top, $skip, $select and $orderby to further refine the results of a query.
http://<host>/sap/opu/odata/sap/<service>/Customers?$filter=Country eq 'US'&$top=5&$skip=5&$orderby=LastName desc&$inlinecount=allpagesIt’s important to note that the $inlinecount option will include the count of the matching results in the response, the count will be included in the “.count” attribute of the response.

5. $filter.jpg
6. $skiptoken: The $skiptoken option is used with the $top option to retrieve a specific page of results by providing a token that represents the position in the result set from where the next set of results should be retrieved. When a partial response is returned by the server, the $skiptoken value is included in the __next link of the response, allowing clients to easily retrieve the next set of results without having to construct or interpret the $skiptoken value themselves.
The syntax for the $skiptoken option is as follows: $skiptoken=token, where the token is a string value representing the position in the result set from where the next set of results should be retrieved.
For example, if we want to retrieve the next set of 10 customers starting from the 11th customer, the URL would look like this:
http://<host>/sap/opu/odata/sap/<service>/Customers?$top=10&$skiptoken='11'The $skiptoken option can be used in combination with other options such as $filter, $top, $select and $orderby to further refine the results of a query.
http://<host>/sap/opu/odata/sap/<service>/Customers?$filter=Country eq 'US'&$top=5&$skiptoken='11'&$orderby=LastName descIt’s important to note that the $skiptoken option is used to navigate through the result set in a pagination manner, and it should be used in conjunction with $top option and the result set should be sorted in the same order as in the query that generated the skiptoken.

6. $skiptoken.jpg
The $skip and $skiptoken looks same in first look but they are some difference. To know further about $skip and $skiptoken you can visit this blog: Difference between $skip and $skiptoken in Odata
Conclusion
SAP has provided us multiple options to play with for real-time requirements with a little effort. I would recommend you to try these query options and debug to see how it works. The blog was divided into the following parts.
- $orderby: sorts data by one or more fields.
- $top and $skip: enable server-side paging.
- $filter: retrieves specific data from an entity set based on a set of criteria.
- $inlinecount: provides the total number of matching records in an entity set.
- $skiptoken: enables server-side paging using a continuation token.$skiptoken is used to enable efficient server-side paging of query results when the size of the data set is too large to be retrieved in a single request. When a server returns a limited number of results along with a $skiptoken value, the client can use this token in a subsequent request to retrieve the next set of results. The $skiptoken value serves as an identifier of the last result returned by the server and helps the server to skip to the next set of results efficiently.
There are five major category of HTTP status/error codes, listed below….
- 1xx Informational
- 2xx Success
- 3xx Redirection
- 4xx Client Error
- 5xx Server Error
1xx Informational
Request received, continuing process.
This class of status code indicates a provisional response, consisting only of the Status-Line and optional headers, and is terminated by an empty line. Since HTTP/1.0 did not define any 1xx status codes, servers must not send a 1xx response to an HTTP/1.0 client except under experimental conditions.
100 Continue
This means that the server has received the request headers, and that the client should proceed to send the request body (in the case of a request for which a body needs to be sent; for example, a POST request). If the request body is large, sending it to a server when a request has already been rejected based upon inappropriate headers is inefficient. To have a server check if the request could be accepted based on the request’s headers alone, a client must send Expect: 100-continue as a header in its initial request and check if a 100 Continue status code is received in response before continuing (or receive 417 Expectation Failed and not continue).
101 Switching Protocols
This means the requester has asked the server to switch protocols and the server is acknowledging that it will do so.
102 Processing
As a WebDAV request may contain many sub-requests involving file operations, it may take a long time to complete the request. This code indicates that the server has received and is processing the request, but no response is available yet. This prevents the client from timing out and assuming the request was lost.
2xx Success
This class of status codes indicates the action requested by the client was received, understood, accepted and processed successfully.
200 OK
Standard response for successful HTTP requests. The actual response will depend on the request method used. In a GET request, the response will contain an entity corresponding to the requested resource. In a POST request the response will contain an entity describing or containing the result of the action.
201 Created
The request has been fulfilled and resulted in a new resource being created.
202 Accepted
The request has been accepted for processing, but the processing has not been completed. The request might or might not eventually be acted upon, as it might be disallowed when processing actually takes place.
203 Non-Authoritative Information (since HTTP/1.1)
The server successfully processed the request, but is returning information that may be from another source.
204 No Content
The server successfully processed the request, but is not returning any content. Usually used as a response to a successful delete request.
205 Reset Content
The server successfully processed the request, but is not returning any content. Unlike a 204 response, this response requires that the requester reset the document view.
206 Partial Content
The server is delivering only part of the resource (byte serving) due to a range header sent by the client. The range header is used by tools like wget to enable resuming of interrupted downloads, or split a download into multiple simultaneous streams.
207 Multi-Status
The message body that follows is an XML message and can contain a number of separate response codes, depending on how many sub-requests were made.
208 Already Reported
The members of a DAV binding have already been enumerated in a previous reply to this request, and are not being included again.
226 IM Used
The server has fulfilled a request for the resource, and the response is a representation of the result of one or more instance-manipulations applied to the current instance.
3xx Redirection
This class of status code indicates the client must take additional action to complete the request. Many of these status codes are used in URL redirection.
A user agent may carry out the additional action with no user interaction only if the method used in the second request is GET or HEAD. A user agent should not automatically redirect a request more than five times, since such re-directions usually indicate an infinite loop.
300 Multiple Choices
Indicates multiple options for the resource that the client may follow. It, for instance, could be used to present different format options for video, list files with different extensions, or word sense disambiguation.
301 Moved Permanently
This and all future requests should be directed to the given URL.
302 Found
This is an example of industry practice contradicting the standard. The HTTP/1.0 specification (RFC 1945) required the client to perform a temporary redirect (the original describing phrase was “Moved temporarily”), but popular browsers implemented 302 with the functionality of a 303 See Other. Therefore, HTTP/1.1 added status codes 303 and 307 to distinguish between the two behaviors. However, some Web applications and frameworks use the 302 status code as if it were the 303.
303 See Other (since HTTP/1.1)
The response to the request can be found under another URL using a GET method. When received in response to a POST (or PUT/DELETE), it should be assumed that the server has received the data and the redirect should be issued with a separate GET message.
304 Not Modified
Indicates that the resource has not been modified since the version specified by the request headers If-Modified-Since or If-None-Match. This means that there is no need to re-transmit the resource, since the client still has a previously-downloaded copy.
305 Use Proxy (since HTTP/1.1)
The requested resource is only available through a proxy, whose address is provided in the response. Many HTTP clients (such as Mozilla and Internet Explorer) do not correctly handle responses with this status code, primarilyfor security reasons.
306 Switch Proxy
No longer used. Originally meant “Subsequent requests should use the specified proxy.”
307 Temporary Redirect (since HTTP/1.1)
In this case, the request should be repeated with another URI; however, future requests should still use the original URI. In contrast to how 302 were historically implemented, the request method is not allowed to be changed when reissuing the original request. For instance, a POST request should be repeated using another POST request.
308 Permanent Redirect
The request, and all future requests should be repeated using another URI. 307 and 308 (as proposed) parallel the behaviours of 302 and 301, but do not allow the HTTP method to change. So, for example, submitting a form to a permanently redirected resource may continue smoothly.
4xx Client Error
The 4xx class of status code is intended for cases in which the client seems to have errored. Except when responding to a HEAD request, the server should include an entity containing an explanation of the error situation, and whether it is a temporary or permanent condition. These status codes are applicable to any request method. User agents should display any included entity to the user.
400 Bad Request
The server cannot or will not process the request due to something that is perceived to be a client error.
401 Unauthorized
Similar to 403 Forbidden, but specifically for use when authentication is required and has failed or has not yet been provided. The response must include a WWW-Authenticate header field containing a challenge applicable to the requested resource. See Basic access authentication and Digest access authentication.
402 Payment Required
Reserved for future use. The original intention was that this code might be used as part of some form of digital cash or micropayment scheme, but that has not happened, and this code is not usually used. YouTube uses this status if a particular IP address has made excessive requests, and requires the person to enter a CAPTCHA.
403 Forbidden
The request was a valid request, but the server is refusing to respond to it. Unlike a 401 Unauthorized response, authenticating will make no difference.
404 Not Found
The requested resource could not be found but may be available again in the future. Subsequent requests by the client are permissible.
405 Method Not Allowed
A request was made of a resource using a request method not supported by that resource; for example, using GET on a form which requires data to be presented via POST, or using PUT on a read-only resource.
406 Not Acceptable
The requested resource is only capable of generating content not acceptable according to the Accept headers sent in the request.
407 Proxy Authentication Required
The client must first authenticate itself with the proxy.
408 Request Timeout
The server timed out waiting for the request. According to HTTP specifications: “The client did not produce a request within the time that the server was prepared to wait. The client MAY repeat the request without modifications at any later time.”
409 Conflict
Indicates that the request could not be processed because of conflict in the request, such as an edit conflict in the case of multiple updates.
410 Gone
Indicates that the resource requested is no longer available and will not be available again. This should be used when a resource has been intentionally removed and the resource should be purged. Upon receiving a 410 status code, the client should not request the resource again in the future. Clients such as search engines should remove the resource from their indices. Most use cases do not require clients and search engines to purge the resource, and a “404 Not Found” may be used instead.
411 Length Required
The request did not specify the length of its content, which is required by the requested resource.
412 Precondition Failed
The server does not meet one of the preconditions that the requester put on the request.
413 Request Entity Too Large
The request is larger than the server is willing or able to process.
414 Request-URL Too Long
The URL provided was too long for the server to process. Often the result of too much data being encoded as a query-string of a GET request, in which case it should be converted to a POST request.
415 Unsupported Media Type
The request entity has a media type which the server or resource does not support. For example, the client uploads an image as image/svg+xml, but the server requires that images use a different format.
416 Requested Range Not Satisfiable
The client has asked for a portion of the file (byte serving), but the server cannot supply that portion. For example, if the client asked for a part of the file that lies beyond the end of the file.
417 Expectation Failed
The server cannot meet the requirements of the Expect request-header field.
418 I’m a teapot (RFC 2324)
This code was defined in 1998 as one of the traditional IETF April Fools’ jokes, in RFC 2324, Hyper Text Coffee Pot Control Protocol, and is not expected to be implemented by actual HTTP servers.
419 Authentication Timeout
Not a part of the HTTP standard, 419 Authentication Timeout denotes that previously valid authentication has expired. It is used as an alternative to 401 Unauthorized in order to differentiate from otherwise authenticated clients being denied access to specific server resources
420 Method Failure (Spring Framework)
Not part of the HTTP standard, but defined by spring in the HttpStatus class to be used when a method failed. This status code is deprecated by spring.
420 Enhance Your Calm (Twitter)
Not part of the HTTP standard, but returned by version 1 of the Twitter Search and Trends API when the client is being rate limited. Other services may wish to implement the 429 Too Many Requests response code instead.
422 Un-processable Entity
The request was well-formed but was unable to be followed due to semantic errors
423 Locked
The resource that is being accessed is locked.
424 Failed Dependency (WebDAV; RFC 4918)
The request failed due to failure of a previous request (e.g., a PROPPATCH).
426 Upgrade Required
The client should switch to a different protocol such as TLS/1.0.
428 Precondition Required
The origin server requires the request to be conditional. Intended to prevent “the ‘lost update’ problem, where a client GETs a resource’s state, modifies it, and PUTs it back to the server, when meanwhile a third party has modified the state on the server, leading to a conflict.”
429 Too Many Requests
The user has sent too many requests in a given amount of time. Intended for use with rate limiting schemes.
431 Request Header Fields Too Large
The server is unwilling to process the request because either an individual header field or all the header fields collectively, are too large.
440 Login Timeout (Microsoft)
A Microsoft extension. Indicates that your session has expired.
444 No Response (Nginx)
Used in Nginx logs to indicate that the server has returned no information to the client and closed the connection (useful as a deterrent for malware).
449 Retry With (Microsoft)
A Microsoft extension. The request should be retried after performing the appropriate action.
Often search-engines or custom applications will ignore required parameters. Where no default action is appropriate, the Aviongoo website sends a “HTTP/1.1 449 Retry with valid parameters: param1, param2 . . .” response. The applications may choose to learn, or not.
450 Blocked by Windows Parental Controls (Microsoft)
A Microsoft extension. This error is given when Windows Parental Controls are turned on and are blocking access to the given webpage.
451 Unavailable For Legal Reasons (Internet draft)
Defined in the internet draft “A New HTTP Status Code for Legally-restricted Resources” Intended to be used when resource access is denied for legal reasons, e.g. censorship or government-mandated blocked access. A reference to the 1953 dystopian novel Fahrenheit 451, where books are outlawed
451 Redirect (Microsoft)
Used in Exchange ActiveSync if there either is a more efficient server to use or the server cannot access the users’ mailbox.
The client is supposed to re-run the HTTP Autodiscovery protocol to find a better suited server
494 Request Header Too Large (Nginx)
Nginx internal code similar to 431 but it was introduced earlier in version 0.9.4 (on January 21, 2011)
495 Cert Error (Nginx)
Nginx internal code used when SSL client certificate error occurred to distinguish it from 4XX in a log and an error page redirection.
496 No Cert (Nginx)
Nginx internal code used when client didn’t provide certificate to distinguish it from 4XX in a log and an error page redirection.
497 HTTP to HTTPS (Nginx)
Nginx internal code used for the plain HTTP requests that are sent to HTTPS port to distinguish it from 4XX in a log and an error page redirection.
498 Token expired/invalid (Esri)
Returned by ArcGIS for Server. A code of 498 indicates an expired or otherwise invalid token.
499 Client Closed Request (Nginx)
Used in Nginx logs to indicate when the connection has been closed by client while the server is still processing its request, making server unable to send a status code back.
499 Token required (Esri)
Returned by ArcGIS for Server. A code of 499 indicates that a token is required (if no token was submitted).
5xx Server Error
The server failed to fulfill an apparently valid request.
Response status codes beginning with the digit “5” indicate cases in which the server is aware that it has encountered an error or is otherwise incapable of performing the request. Except when responding to a HEAD request, the server should include an entity containing an explanation of the error situation, and indicate whether it is a temporary or permanent condition. Likewise, user agents should display any included entity to the user. These response codes are applicable to any request method.
500 Internal Server Error
A generic error message, given when an unexpected condition was encountered and no more specific message is suitable.
501 Not Implemented
The server either does not recognize the request method, or it lacks the ability to fulfill the request. Usually this implies future availability (e.g., a new feature of a web-service API).
502 Bad Gateway
The server was acting as a gateway or proxy and received an invalid response from the upstream server.
503 Service Unavailable
The server is currently unavailable (because it is overloaded or down for maintenance). Generally, this is a temporary state.
504 Gateway Timeout
The server was acting as a gateway or proxy and did not receive a timely response from the upstream server.
505 HTTP Version Not Supported
The server does not support the HTTP protocol version used in the request.
506 Variant Also Negotiates
Transparent content negotiation for the request results in a circular reference.
507 Insufficient Storage
The server is unable to store the representation needed to complete the request.
508 Loop Detected (WebDAV; RFC 5842)
The server detected an infinite loop while processing the request (sent in lieu of 208 Already Reported).
509 Bandwidth Limit Exceeded (Apache bw/limited extension)
This status code is not specified in any RFCs. Its use is unknown.
510 Not Extended
Further extensions to the request are required for the server to fulfil it.
511 Network Authentication Required
The client needs to authenticate to gain network access. Intended for use by intercepting proxies used to control access to the network (e.g., “captive portals” used to require agreement to Terms of Service before granting full Internet access via a Wi-Fi hotspot).
520 Origin Error (CloudFlare)
This status code is not specified in any RFCs, but is used by CloudFlare’s reverse proxies to signal an “unknown connection issue between CloudFlare and the origin web server” to a client in front of the proxy.
521 Web server is down (CloudFlare)
This status code is not specified in any RFCs, but is used by CloudFlare’s reverse proxies to indicate that the origin webserver refused the connection.
522 Connection timed out (CloudFlare)
This status code is not specified in any RFCs, but is used by CloudFlare’s reverse proxies to signal that a server connection timed out.
523 Proxy Declined Request (CloudFlare)
This status code is not specified in any RFCs, but is used by CloudFlare’ s reverse proxies to signal a resource that has been blocked by the administrator of the website or proxy itself.
524 A timeout occurred (CloudFlare)
This status code is not specified in any RFCs, but is used by cloud Flare’s reverse proxies to signal a network read timeout behind the proxy to a client in front of the proxy.
598 Network read timeout error (Unknown)
This status code is not specified in any RFCs, but is used by Microsoft HTTP proxies to signal a network read timeout behind the proxy to a client in front of the proxy.
599 Network connect timeout error (Unknown)
This status code is not specified in any RFCs, but is used by Microsoft HTTP proxies to signal a network connect timeout behind the proxy to a client in front of the proxy.
SAP CDS Views lets you directly access the HANA database and its underlying tables. They perform a “Code Pushdown” or “Code-to-Data” to push application or business logic from the application server to the client side or database. After selecting the logic from the Advanced Business Application Programming (ABAP) language, the SAP CDS Views execute it on the database and not on the application server.
In most SAP programming models, ABAP CDS Views is the core technology. SAP S/4HANA development also uses ABAP CDS Views. With ABAP CDS Views, you can create semantically rich data models. User interface clients can view these models through the application services. Before starting an ABAP CDS View, define an application's data model and underlying database tables. You can then deploy the basic interface or foundation layer of the CDS View over the database tables to project-provided fields.
To create an ABAP CDS View, use Eclipse software and ABAP Development Tools (ADT) to open the ABAP Perspective. Using Project Explorer, choose the package node in the ABAP project to create the table and right-click on it to open the context menu. You can select “New” > “Other ABAP Repository” > “Core Data Services” > “Data Definition” and then use the CDS creation wizard to enter a name and description. Next, choose one of the available templates to create a CDS View outline and click “Finish”. You can add any fields or associations in the source-code editor.
The two types of CDS Views are HANA CDS Views and ABAP CDS Views. The ABAP CDS Views are useful for application development work, while the HANA CDS Views provide access to the HANA database's underlying tables. While both use the ABAP code, they differ in characteristics, such as their implementation, focus, programming language and platforms.
You can implement ABAP CDS Views in any database, while HANA CDS Views require implementation in HANA. ABAP CDS Views use Open SQL, while HANA CDS Views use Native SQL. ABAP CDS Views use the application server ABAP, while HANA CDS uses the HANA Extended Application Services platform.
A metadata extension in CDS Views is a CDS object or entity that a separate DDLX source code defines and transports. You can only create metadata extensions in CDS Views and edit the DDLX source code with the ADT. The metadata extensions use CDS annotations to extend CDS entities. One CDS entity can have multiple metadata extensions, and each metadata extension is assigned to a different layer, such as a customer, partner or branch. When evaluating CDS entity annotations for selecting the metadata extension, you can join a metadata extension to a specified CDS variant.
In an evaluation, the metadata extension layers determine the priority, with those of a specified variant searching for annotations first and then those without joining to a variant. The extensions are advantageous, as they separate metadata in the annotations from the view's implementation, improve source code readability and simplify CDS View development and maintenance.
An association in CDS Views gathers data from multiple tables. Since it links a view or a table to the source view or table in CDS Views, it defines relationships between CDS entities. It is also a Join-on-demand because you can access the data in the joined or associated tables only on demand, not directly at run time. That is, the association occurs only when the user requires the data.
To specify an association, you can add an element to a source entity with an association type pointing to a target entity. It can help to learn about the defined cardinality and the relationship between the source, the CDS View or the table it associates with. Knowing which keys to use is also necessary. You can have managed and unmanaged associations in CDS Views.
An ABAP Unit is a framework integrated into the ABAP language. Since the tests are in ABAP language, it is not necessary to use another scripting language for the testing. You also do not require additional tools for the test development, since the regular ADT is sufficient for writing the unit tests.
With the ABAP Unit framework, you can implement unit tests and execute them manually and automatically. The ABAP Unit tests aim to verify the correct behaviour of even small testable units, such as the methods of specially designated ABAP classes. Since the ABAP Unit tests get transported with the tested ABAP repository objects, you can use them in all development and testing systems.
https://www.brandeis.de/en/blog/cheat-sheet-cds-abap
Objects from classic CDS views
For CDS views, three different objects are created in the object catalog (table TADIR):
- DDL file - The source code file , which is created and edited with the ADT in Eclipse. Only this object is in the object list of transport requests (object type DDLS).
- CDS entity - The CDS object that represents all the properties of the view, including annotations, associations, and permission checks. This object is used in ABAP programs.
- SQL database view - A database view that is also displayed as a view in DDic, but should not be used from an ABAP perspective.
The DDL file and the CDS entity usually have the same technical name. The SQL database view must have a different name than the CDS entity, since both are in the same namespace.
With Release 7.55, a new object type has been added to the classic CDS View, the CDS View Entity, which has no SQL database view. It is recommended by SAP to use these objects if you are on the appropriate system level.
Associations can be used to describe the relationships between CDS entities. They define a JOIN that is executed only, if the fields are retrieved from the associated entity. These queries are created with so-called path expressions and can run across multiple CDS entities.
DEFINE VIEW zcds_as_soi  //SalesOrderItem
  AS SELECT FROM snwd_so_i AS soi
  ASSOCIATION [1] TO snwd_pd AS _product
  ON soi.product_guid = _product.node_key
  ASSOCIATION [1] TO zcds_as_so AS _salesOrder
  ON soi.parent_key = _salesOrder.NodeKey
{
<fieldList>
...
_product,
_salesOrder
}
The names of the associations always start with an underscore. They are included in the field list and thus they are available to the users of the CDS View.
The cardinality can be specified in square brackets: [Min..Max]. If only Max is specified, the Min value is assumed to be 0. By default, it is [0..1]. Permitted values are e.g. [1], [*], [1..1], [1..*] or [0..*].
Path expressions
Path expressions can be used to include fields from associated sources in the field list of the CDS view or query on the CDS entity. The path expressions can also go over several levels. It is also possible to add attributes to the evaluation of the associations, for example to filter or to define the join type:
_sales_order.BillingStatus,
_sales_order._buyer.company_name
_sales_order._buyer[LEFT OUTER
         WHERE legal_form = 'GmbH'].company_name
In ABAP SQL
The path expressions can be used in ABAP SQL. However, the syntax is slightly different. Before associations, and as separator between them, there is always a backslash (\). The component is addressed (as usual in ABAP) with a hyphen (-):
SELECT _sales_order_buyer[LEFT OUTER
          WHERE legal_form = 'GmbH']-company_name
FROM zcds_my_view
INTO TABLE @DATA(lt_tmp).In accordance with consistency and how validity of annotations is evaluated, SAP's annotations are divided into the following categories:
- ABAP annotations are evaluated by the ABAP runtime environment.
- Component annotations are evaluated by the relevant SAP framework.
Comments
Post a Comment